树莓派的root账号默认没有开启,并且没有设置密码,我们先设置root账号的密码:
sudo passwd root
然后解锁root用户:
sudo passwd --unlock root
此时可以看见提示:
接下来使用su切换root用户后执行即可:
su
树莓派的root账号默认没有开启,并且没有设置密码,我们先设置root账号的密码:
sudo passwd root
然后解锁root用户:
sudo passwd --unlock root
此时可以看见提示:
接下来使用su切换root用户后执行即可:
su
省略1万字,请看我前几篇文章
到以下网址下载sonar-scanner:(一般下载最新版即可)
下载sonar-scanner
https://docs.sonarqube.org/latest/analyzing-source-code/scanners/sonarscanner/
下载完毕后进行解压
编辑/etc/profile文件,补充以下两个配置:
#sonar-scanner的环境变量 export SONAR_SCANNER=/home/sonar-scanner-4.7.0.2747-linux #PATH环境变量 export PATH=$PATH:$SONAR_SCANNER/bin
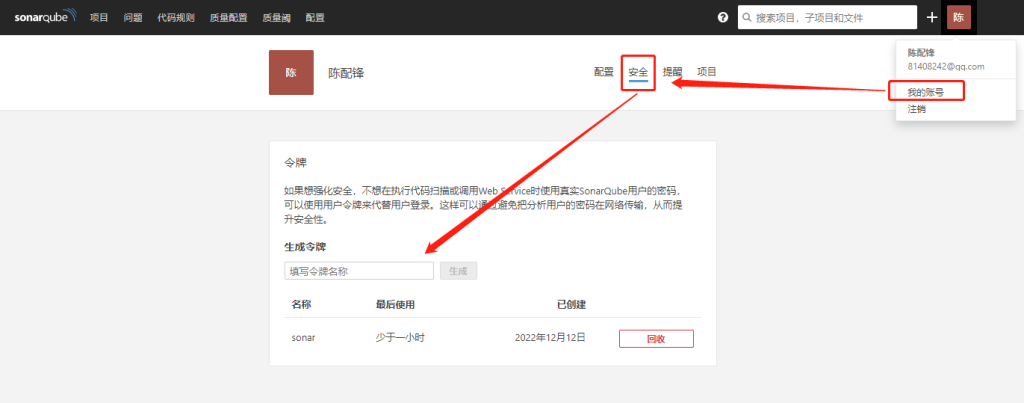
使用管理员账号如下图所示进行操作即可获得令牌:
该令牌用于扫描器进行鉴权。
以下参数根据实际情况进行调整:
sonar-scanner -Dsonar.projectKey=$CI_PROJECT_NAME -Dsonar.host.url=https://****** -Dsonar.login=****** -Dsonar.sources=./src/ -Dsonar.sourceEncoding=UTF-8 -Dsonar.gitlab.commit_sha=$CI_BUILD_REF -Dsonar.gitlab.ref_name=$CI_BUILD_REF_NAME -Dsonar.gitlab.project_id=$CI_PROJECT_PATH -Dsonar.gitlab.max_blocker_issues_gate=-1 -Dsonar.gitlab.max_critical_issues_gate=-1 -Dsonar.gitlab.query_max_retry=50 -Dsonar.gitlab.query_wait=100
执行后可在sonar后台中查看扫描结果:
通过此集成,您将能够:
使用 GitLab 进行身份验证- 使用您的 GitLab 凭据登录 SonarQube。
导入您的 GitLab 项目- 将您的 GitLab 项目导入 SonarQube 以轻松设置 SonarQube 项目。
使用 GitLab CI/CD 分析项目- 将分析集成到您的构建管道中。从Developer Edition开始,在 GitLab CI/CD 作业中运行的 SonarScanners 可以自动检测正在构建的分支或合并请求,因此您无需专门将它们作为参数传递给扫描仪。
将您的 Quality Gate 状态报告给您的合并请求-(社区版没有该功能)直接在 GitLab 中查看您的 Quality Gate 和代码指标结果,以便您知道合并更改是否安全。
sonarqube 支持多种认证登录方式,如果使用自带的账号体系,需要管理员一个个添加账号,使用起来多有不便。不过一般公司都部署了私有化的 Gitlab,我们可以利用私有的 gitlab 账号来登录 Sonarqube。
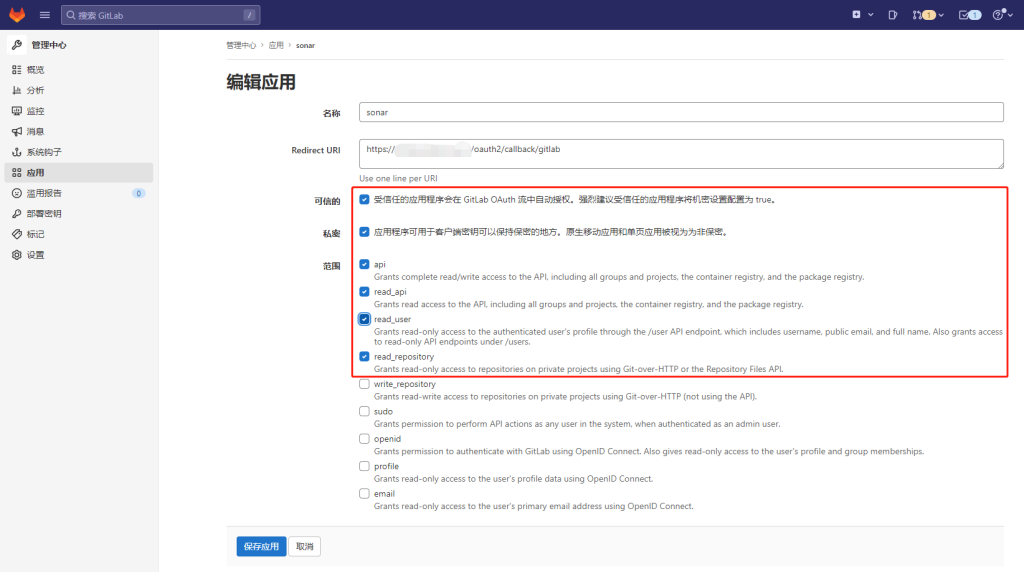
注意勾选项!另外涂抹掉的是您sonar的地址,/oauth2/callback/gitlab 是固定的。
保存后可以拿到应用id、密码,如下图所示:
https://www.sonarplugins.com/authgitlab
进入以上网址下载插件并放到sonar安装目录的/extensions/plugins下,然后重启。
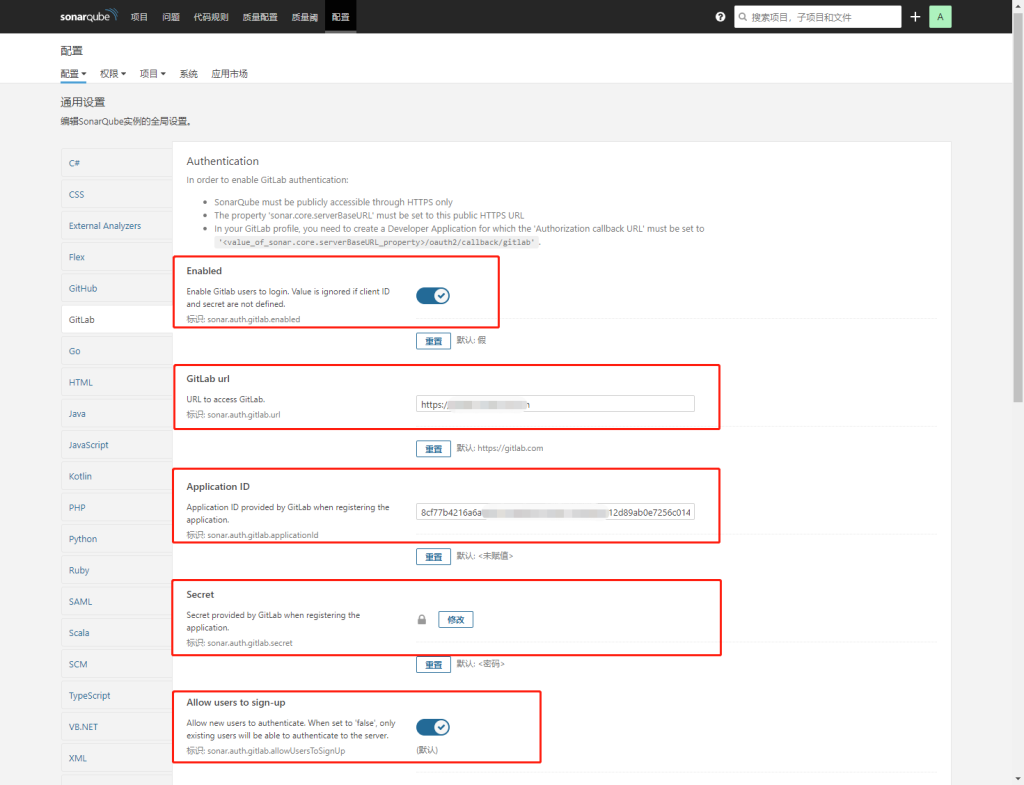
在“通用”里面找到如下图所示的设置:
注销账号后,再次进入登录界面便可以看到效果,如下图所示:
使用gitlab账号登录后,对应gitlab账号在sonar中便会有该用户数据,此时用admin设置新的管理员后,就可以用赋予了sonar管理员权限的gitlab账号登录并把默认的admin账号注销了。
首先拉取SonarQube7.8镜像
sonar会自动创建数据库所需要的表,但是不会自动创建数据库,因此请提前创建名为sonar的数据库
然后使用以下指令启动mysql(注意修改mysql的链接参数):
docker run -d --restart=always --name sonar -p 9000:9000 -e SONARQUBE_JDBC_USERNAME=username -e SONARQUBE_JDBC_PASSWORD=password -e SONARQUBE_DATABASE_NAME=sonar -e SONARQUBE_JDBC_URL="jdbc:mysql://***.***.***.***:3306/sonar?useUnicode=true&characterEncoding=utf8&rewriteBatchedStatements=true&useConfigs=maxPerformance&useSSL=false" sonarqube:7.8-community
sonar的默认端口是9000,默认账号和密码是admin。
在gitlab跑cicd的时候使用docker stop命令时若容器不存在则会报错,因此docker服务器上如果不曾有对应的容器,则需要使用docker rm -f的命令代替。
docker rm [OPTIONS] CONTAINER [CONTAINER...]
option | 作用 |
-f | 通过 SIGKILL 信号删除一个正在运行的容器 |
-l | 移除容器间的网络,而非容器本身 |
-v | 删除与容器映射的目录 |
强制删除容器
docker rm -f CONTAINER
删除所有已停止的容器
docker rm $(docker ps -a -q)
删除所有容器
docker rm -f $(docker ps -aq) #删除所有的容器 docker ps -a -q|xargs docker rm #删除所有的容器
在cicd配置文件中加入“allow_failure: true”参数,如下图所示:
找到配置文件,可能是以下位置:
/www/server/mongodb/config.conf
## content systemLog: destination: file logAppend: true path: /www/server/mongodb/log/config.log # Where and how to store data. storage: dbPath: /www/server/mongodb/data directoryPerDB: true journal: enabled: true # how the process runs processManagement: fork: true pidFilePath: /www/server/mongodb/log/configsvr.pid # network interfaces net: port: 27017 # bindIp: 127.0.0.1 bindIp: 127.0.0.1 172.17.0.4 # bindIpAll: true #operationProfiling: #replication: # replSetName: bt_main security: authorization: disabled javascriptEnabled: false #sharding: # clusterRole: shardsvr
修改原来的bindIp,改为以” “分隔的多个IP(注意:mongodb 4.x以前是用”,”分隔)
另外,配置bindIpAll: true的话则代表所有ip均能访问(bindIp: 0.0.0.0也能达到同样效果),重启mongodb服务后生效。
执行以下指令:
echo "deb http://mirrors.163.com/debian/ jessie main non-free contrib" >> /etc/apt/sources.list
apt-get update
apt-get install vim
apt-get install iputils-ping
apt-get install net-tools
首先需要准备以下几个配置文件:
application.yml(默认配置)
application-dev.yml(开发环境配置)
application-prof.yml(生产环境配置)
application.yml中必须包含以下配置,否则不生效:
spring:
profiles:
active: @profiles.active@
并且在pom.xml文件中的project节点内增加以下配置:
<!--设置不同的环境配置文件--> <profiles> <profile> <id>dev</id> <properties> <profiles.active>dev</profiles.active> </properties> <!--设置当前的配置为默认配置--> <activation> <activeByDefault>true</activeByDefault> </activation> </profile> <profile> <id>prod</id> <properties> <profiles.active>prod</profiles.active> </properties> </profile> </profiles>
最后使用以下命令来指定配置文件打包即可(-P后面接的是配置文件的id):
mvn clean package -P prof
# This file is a template, and might need editing before it works on your project. # This is a sample GitLab CI/CD configuration file that should run without any modifications. # It demonstrates a basic 3 stage CI/CD pipeline. Instead of real tests or scripts, # it uses echo commands to simulate the pipeline execution. # # A pipeline is composed of independent jobs that run scripts, grouped into stages. # Stages run in sequential order, but jobs within stages run in parallel. # # For more information, see: https://docs.gitlab.com/ee/ci/yaml/index.html#stages # # You can copy and paste this template into a new `.gitlab-ci.yml` file. # You should not add this template to an existing `.gitlab-ci.yml` file by using the `include:` keyword. # # To contribute improvements to CI/CD templates, please follow the Development guide at: # https://docs.gitlab.com/ee/development/cicd/templates.html # This specific template is located at: # https://gitlab.com/gitlab-org/gitlab/-/blob/master/lib/gitlab/ci/templates/Getting-Started.gitlab-ci.yml stages: # List of stages for jobs, and their order of execution. - build # - test - deploy build-job: # This job runs in the build stage, which runs first. stage: build script: - echo "Compiling the code..." - npm install - npm run build - docker build -t yuexi_admin . - echo "Compile complete." #unit-test-job: # This job runs in the test stage. # stage: test # It only starts when the job in the build stage completes successfully. # script: # - echo "Running unit tests... This will take about 60 seconds." # - sleep 60 # - echo "Code coverage is 90%" #lint-test-job: # This job also runs in the test stage. # stage: test # It can run at the same time as unit-test-job (in parallel). # script: # - echo "Linting code... This will take about 10 seconds." # - sleep 10 # - echo "No lint issues found." deploy-job: # This job runs in the deploy stage. stage: deploy # It only runs when *both* jobs in the test stage complete successfully. environment: production script: - echo "Deploying application..." - docker stop yuexi_admin - docker rm yuexi_admin - docker run -d -p 8611:80 --name yuexi_admin yuexi_admin - echo "Application successfully deployed."
解决方法,修改gitlab的cicd配置,如下图所示: