• Category Archives: Java

安装RabbitMQ

一、安装ERLANG

RabbitMQ依赖语言开发包ErLang,到http://www.erlang.org/downloads下载windows版本并安装,安装后需要配置环境变量:

1、增加系统变量:ERLANG_HOME=C:\Program Files\erl-23.0

2、在Path系统变量中增加:%ERLANG_HOME%\bin

然后在CMD中输入指令“erl”即可验证是否配置成功:

111


二、安装RabbitMQ

到https://www.rabbitmq.com/download.html下载windows版本病安装,安装后需要配置环境变量:

1、增加系统变量:RABBITMQ_SERVER=C:\Program Files\RabbitMQ Server\rabbitmq_server-3.8.3

2、在Path系统变量中增加:%RABBITMQ_SERVER%\sbin

三、激活RabbitMQ的WEB管理界面(可选)

打开CMD执行命令:rabbitmq-plugins.bat enable rabbitmq_management

222

执行成功后重启RabbitMQ服务(可到“服务”中重启,或在任务栏中也能找到相关菜单),然后访问网址:http://localhost:15672/

333

默认用户名/密码:guest/guest

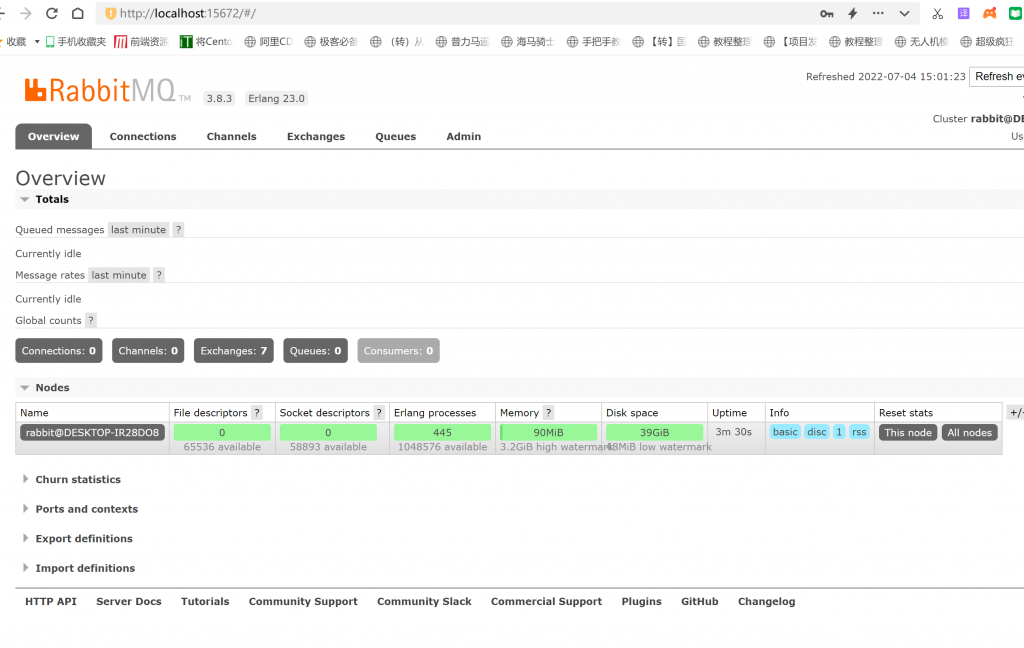
登录后出现如下界面:

444

SpringBoot2.1.1使用Zuul创建SpringCloud微服务Gateway网关

1、在新的SpringBoot项目中的pom.xml引入如下依赖:

		<!-- 引入Zuul starter -->
		<dependency>
			<groupId>org.springframework.cloud</groupId>
			<artifactId>spring-cloud-starter-netflix-zuul</artifactId>
		</dependency>
		<dependency>
			<groupId>org.springframework.cloud</groupId>
			<artifactId>spring-cloud-starter</artifactId>
		</dependency>
		<!-- 连接Eureka -->
		<dependency>
			<groupId>org.springframework.cloud</groupId>
			<artifactId>spring-cloud-starter-netflix-eureka-client</artifactId>
		</dependency>

2、在pom.xml的project中加入SpringCloud的版本管理配置:

	<dependencyManagement>
		<dependencies>
			<dependency>
				<groupId>org.springframework.cloud</groupId>
				<artifactId>spring-cloud-dependencies</artifactId>
				<version>${spring-cloud.version}</version>
				<type>pom</type>
				<scope>import</scope>
			</dependency>
		</dependencies>
	</dependencyManagement>

3、编辑配置文件application.propertites:

spring.application.name = zero4j-zuul-gateway

eureka.client.serviceUrl.defaultZone = http://admin:123456@localhost:8761/eureka/
eureka.instance.instance-id = ${spring.cloud.client.ip-address}:${spring.application.name}:${server.port}
eureka.instance.prefer-ip-address = true

#只要访问以/api/v1/areas开头的多层目录都可以路由到服务名为zero4j-provider-area的服务上.
zuul.routes.zero4j-provider-area.path = /api/v1/areas
zuul.routes.zero4j-provider-area.service-id = zero4j-provider-area
zuul.routes.zero4j-provider-area.stripPrefix = false

server.port = 4000

4、最后在application启动类中加入@EnableDiscoveryClient和@EnableZuulProxy注解:

package com.zero4j;

import org.springframework.boot.SpringApplication;
import org.springframework.boot.autoconfigure.SpringBootApplication;
import org.springframework.cloud.client.discovery.EnableDiscoveryClient;
import org.springframework.cloud.netflix.zuul.EnableZuulProxy;

@EnableDiscoveryClient
@EnableZuulProxy
@SpringBootApplication
public class Zero4jZuulGatewayApplication {

	public static void main(String[] args) {
		SpringApplication.run(Zero4jZuulGatewayApplication.class, args);
	}

}


SpringBoot2.1.1微服务架构引入SpringCloudSecurity安全认证

1、在eureka服务器的pom.xml中引入依赖:

	<!-- Spring Cloud Security 依赖 -->
	<dependency>
            <groupId>org.springframework.boot</groupId>
            <artifactId>spring-boot-starter-security</artifactId>
        </dependency>

2、创建密码安全认证密码匹配规则类MyPasswordEncoder.java:

package com.zero4j.config;

import org.springframework.security.crypto.password.PasswordEncoder;

public class MyPasswordEncoder implements PasswordEncoder {

	@Override
    public String encode(CharSequence charSequence) {
        return charSequence.toString();
    }

    @Override
    public boolean matches(CharSequence charSequence, String s) {
        return s.equals(charSequence.toString());
    }
    
}

3、在eureka服务器中创建配置类SecurityConfig.java:

package com.zero4j.config;

import org.springframework.beans.factory.annotation.Autowired;
import org.springframework.context.annotation.Bean;
import org.springframework.context.annotation.Configuration;
import org.springframework.security.crypto.bcrypt.BCryptPasswordEncoder;
import org.springframework.security.crypto.factory.PasswordEncoderFactories;
import org.springframework.security.crypto.password.PasswordEncoder;
import org.springframework.security.config.annotation.authentication.builders.AuthenticationManagerBuilder;
import org.springframework.security.config.annotation.web.builders.HttpSecurity;
import org.springframework.security.config.annotation.web.configuration.EnableWebSecurity;
import org.springframework.security.config.annotation.web.configuration.WebSecurityConfigurerAdapter;

@Configuration
@EnableWebSecurity
public class SecurityConfig extends WebSecurityConfigurerAdapter {
    
	@Bean
    public PasswordEncoder passwordEncoder() {
        return PasswordEncoderFactories.createDelegatingPasswordEncoder();
    }
    
    //@Autowired
    //BCryptPasswordEncoder passwordEncoder;

    @Override
    protected void configure(AuthenticationManagerBuilder auth) throws Exception {
    	
    	//以前可以不指定PasswordEncoder,但是新的SpringBoot依赖的SpringCloudScurity需要了
    	//auth.inMemoryAuthentication().withUser("admin").password("123456").roles("ADMIN");
    	//这样,密码以明文的方式进行匹配
    	auth.inMemoryAuthentication().passwordEncoder(new MyPasswordEncoder()).withUser("admin").password("123456").roles("ADMIN");
    	//auth.inMemoryAuthentication().withUser("admin").password(passwordEncoder.encode("123456")).roles("ADMIN");
    }

    @Override
    protected void configure(HttpSecurity http) throws Exception {
        http.csrf().ignoringAntMatchers("/eureka/**");
        super.configure(http);
    }
}

4、启动服务,访问eureka服务中心,使用admin:123456进行登录,成功进入eureka控制台

5、对微服务提供者的application.propertites说引用的eureka服务中心地址的前面加入“admin:123456@”,如:http\://admin:123456@localhost\:8761/eureka/ ,然后启动即可~

SpringBoot2.1.1使用SpringCloud的Feign调用Eureka微服务并开启Hystrix熔断机制

1、先在pom.xml中引入如下依赖:

	<!--Netflix Eureka依赖-->
	<dependency>
		<groupId>org.springframework.cloud</groupId>
		<artifactId>spring-cloud-starter-netflix-eureka-client</artifactId>
	</dependency>
	<dependency>
		<groupId>org.springframework.cloud</groupId>
		<artifactId>spring-cloud-starter-netflix-ribbon</artifactId>
	</dependency>
	<!--springcloud整合的openFeign-->
        <dependency>
            <groupId>org.springframework.cloud</groupId>
            <artifactId>spring-cloud-starter-openfeign</artifactId>
        </dependency>

2、在pom.xml中的<project></project>之间增加以下关于springcloud的版本管理:

	<dependencyManagement>
		<dependencies>
			<dependency>
			<groupId>org.springframework.cloud</groupId>
			<artifactId>spring-cloud-dependencies</artifactId>
			<version>${spring-cloud.version}</version>
			<type>pom</type>
			<scope>import</scope>
			</dependency>
		</dependencies>
	</dependencyManagement>

3、在application.propertites中增加如下配置:

#feign的配置,连接超时及读取超时配置
feign.client.config.default.connectTimeout=5000
feign.client.config.default.readTimeout=5000
feign.client.config.default.loggerLevel=basic
#开启熔断功能
feign.hystrix.enabled=true

4、在application启动入口增加@EnableFeignClients注解:

@EnableFeignClients
@ImportResource("classpath:hibernate.xml")
@SpringBootApplication
public class Zero4jApplication extends SpringBootServletInitializer{
	
	@Override
	protected SpringApplicationBuilder configure(SpringApplicationBuilder builder) {
		return builder.sources(Zero4jApplication.class);
	}

	public static void main(String[] args) {
		SpringApplication.run(Zero4jApplication.class, args);
	}

}

5、创建FeignClient客户端:

package com.zero4j.controller.api.v1;

import org.springframework.cloud.openfeign.FeignClient;
import org.springframework.web.bind.annotation.DeleteMapping;
import org.springframework.web.bind.annotation.GetMapping;
import org.springframework.web.bind.annotation.PatchMapping;
import org.springframework.web.bind.annotation.PathVariable;
import org.springframework.web.bind.annotation.PostMapping;
import org.springframework.web.bind.annotation.RequestParam;

@FeignClient(value="zero4j-provider-area", fallback=AreasApiHystrixV1.class)
public interface AreasApiFeignClientV1 {

	@PatchMapping(value="api/v1/areas/{id}")
	String update(
			@PathVariable(value="id") String id,
			@RequestParam(value="token",required=false) String token,
			@RequestParam(value="name",required=false) String name,
			@RequestParam(value="parentId",required=false) String parentId,
			@RequestParam(value="hasChildren",required=false) Boolean hasChildren
		);

}

6、编写调用微服务的Controller:

package com.zero4j.controller.api.v1;

import java.util.HashMap;
import java.util.Map;

import javax.servlet.http.HttpServletRequest;
import javax.servlet.http.HttpServletResponse;

import net.sf.json.JSONObject;

import org.hibernate.SessionFactory;
import org.springframework.beans.factory.annotation.Autowired;
import org.springframework.http.HttpEntity;
import org.springframework.http.HttpHeaders;
import org.springframework.http.HttpMethod;
import org.springframework.http.MediaType;
import org.springframework.http.ResponseEntity;
import org.springframework.web.bind.annotation.DeleteMapping;
import org.springframework.web.bind.annotation.GetMapping;
import org.springframework.web.bind.annotation.PatchMapping;
import org.springframework.web.bind.annotation.PathVariable;
import org.springframework.web.bind.annotation.PostMapping;
import org.springframework.web.bind.annotation.RequestAttribute;
import org.springframework.web.bind.annotation.RequestMapping;
import org.springframework.web.bind.annotation.RequestParam;
import org.springframework.web.bind.annotation.RestController;
import org.springframework.web.client.RestTemplate;

import com.zero4j.model.area.service.AreaService;


@RestController
@RequestMapping("/api/v1/areas")
public class AreasApiControllerV1 {

	@Autowired
	private AreaService areaService;
	
	@Autowired
	private SessionFactory sessionFactory;
	
	@Autowired
	private RestTemplate restTemplate;
	
	@PatchMapping(value="/{id}")
	public ResponseEntity update(HttpServletRequest request,HttpServletResponse response,
			@PathVariable(value="id") String id,
			@RequestParam(required=false) String token,
			@RequestParam(required=false) String name,
			@RequestParam(required=false) String parentId,
			@RequestParam(required=false) Boolean hasChildren
		){
		
		return ResponseEntity.ok((String)areaApiFeignClient.update(id,token,name,parentId,hasChildren));
	}
	

}

7、编写熔断处理方法:

package com.zero4j.controller.api.v1;

import net.sf.json.JSONObject;

import org.springframework.stereotype.Component;

@Component
public class AreasApiHystrixV1 implements AreasApiFeignClientV1 {

	@Override
	public String update(String id, String token, String name, String parentId, Boolean hasChildren) {
		JSONObject out = new JSONObject();
		out.put("status", 400);
		out.put("message", "update服务异常");
		out.put("debug", "update服务异常");
		return out.toString();
	}

}

8、启动服务,访问对应的api,分别在微服务开启、关闭的时候调用API,查看结果即可。

微服务的技术栈

微服务条目 落地技术
服务开发 SpringBoot,Spring,SpringMVC
服务配置与管理 Netflix公司的Archaius、阿里的Diamond等
服务注册与发现 Eureka、Consul、Zookeeper等
服务调用 Rest、RPC、gRPC
服务熔断器 Hystrix、Envoy等
负载均衡 Ribbon、Nginx等
服务接口调用(客户端调用服务的简化工具) Feign等
消息队列 Kafka、RabbitMQ、ActiveMQ等
服务配置中心管理 SpringCloudConfig、Chef等
服务路由(API网关) Zuul等
服务监控 Zabbix、Nagios、Metrics、Specatator等
全链路追踪 Zipkin、Brave、Dapper等
服务部署 Docker、OpenStack、Kubernetes等
数据流操作开发包 SpringCloud Stream(封装与Redis,Rabbit,Kafka等发送接收消息)
事件消息总线 SpringCloud Bus


使用SpringBoot2.1.1配置SpringCloudConfig服务

配置中心服务器:

1、在pom.xml中加入如下依赖:

	        <dependency>
	        	<groupId>org.springframework.boot</groupId>
	        	<artifactId>spring-boot-starter-web</artifactId>
		</dependency>

		<!-- Spring Cloud Config - Server依赖 -->
		<dependency>
			<groupId>org.springframework.cloud</groupId>
			<artifactId>spring-cloud-config-server</artifactId>
			<version>2.1.1.RELEASE</version>
		</dependency>

注意高亮行,这个version需要和springboot的版本号一致。

2、在启动类中加入@EnableConfigServer注解

3、创建bootstrap.yml配置文件,本地配置如下:

#服务启动端口配置:
server:  
  port: 3000
  
#指定配置文件所在目录或地址
spring:
  profiles:
    active: native
  cloud:
    config:
      server:
        native:
          search-locations: classpath:/config/
          #search-locations: D:/Workspaces/zero4j/config/src/main/resources/config

4、在项目的resources(class)目录中创建config文件夹,并在里面新增application-dev.properties文件,内容如下:

server.address=127.0.0.1
server.port=8081
a.url=dev1233

5、启动并访问 http://localhost:3000/application-dev.properties,能看到

配置客户端:

1、在pom.xml中加入如下依赖:

		<dependency>
            		<groupId>org.springframework.boot</groupId>
            		<artifactId>spring-boot-starter-web</artifactId>
        	</dependency>

		<!-- Spring Cloud Config - Client依赖 -->
		<dependency>
			<groupId>org.springframework.cloud</groupId>
			<artifactId>spring-cloud-config-client</artifactId>
			<version>2.1.1.RELEASE</version>
		</dependency>

同样的,version那里切记要跟springboot的版本一致。

2、创建bootstrap.yml配置文件,配置如下:

#启动端口配置:
server:  
  port: 8080

# 指明配置服务中心的网址
spring:
  application:
    name: application
  cloud:
    config:
      label: master
      profile: dev
      uri: http://127.0.0.1:3000

3、创建测试用的controller

package com.zero4j.controller;

import org.springframework.beans.factory.annotation.Value;
import org.springframework.web.bind.annotation.GetMapping;
import org.springframework.web.bind.annotation.RestController;

@RestController
public class TestController {

	@Value("${a.url}")
	private String datUrl;
	
	@GetMapping(value = "/test")
	public String hi(){
		return datUrl;
	}

}

4、启动并访问http://localhost:8081/test,便能看到client获取server的class中config里的配置文件对应的a.url配置

springboot2.1.1+hibernate5.0.12开启数据库二级缓存

首先加入依赖到pom.xml:

		<!-- hibernnate对二级缓存的支持 -->
		<!-- https://mvnrepository.com/artifact/org.hibernate/hibernate-ehcache -->
		<dependency>
		    <groupId>org.hibernate</groupId>
		    <artifactId>hibernate-ehcache</artifactId>
		    <version>5.0.12.Final</version>
		</dependency>
		<!-- https://mvnrepository.com/artifact/net.sf.ehcache/ehcache -->
		<dependency>
		    <groupId>net.sf.ehcache</groupId>
		    <artifactId>ehcache</artifactId>
		    <version>2.10.6</version>
		</dependency>

然后在hibernate.xml配置文件中加入以下参数:

				<!-- hibernate5的二级缓存配置 -->
				<prop key="hibernate.cache.use_second_level_cache">true</prop>
				<prop key="hibernate.cache.region.factory_class">org.hibernate.cache.ehcache.EhCacheRegionFactory</prop>

接着创建二级缓存配置文件ehcache.xml:

<?xml version="1.0" encoding="UTF-8"?>
<ehcache>
    <diskStore path="java.io.tmpdir"/>
    <defaultCache
        maxElementsInMemory="10000"
        eternal="false"
        overflowToDisk="true"
        timeToIdleSeconds="120"
        timeToLiveSeconds="120"
        diskPersistent="false"/>
</ehcache>

最后在需要开启缓存的pojo类中加入注解cache注解:

@Entity
@GenericGenerator(name="idGenerator", strategy="uuid")
@Cache(usage=CacheConcurrencyStrategy.READ_WRITE)
public class Area {

	/**
	 * id:UUID生成法则
	 */
	@Id
	@GeneratedValue(generator="idGenerator")
	private String id;

配置完毕,启动项目,输出hibernate的sql执行语句,会发现第二次查询相同对象时不再执行查询语句。

Spring自定义注解(parameter)

1、新建注解接口VerifyAccount.java:

package com.zero4j.annotation;

import java.lang.annotation.Documented;
import java.lang.annotation.ElementType;
import java.lang.annotation.Retention;
import java.lang.annotation.RetentionPolicy;
import java.lang.annotation.Target;

@Target({ElementType.PARAMETER})
@Retention(RetentionPolicy.RUNTIME)
@Documented

public @interface VerifyAccount {

	String paramName() default "token";
	
	String permission() default "";
}

2、创建注解对应的切面类VerifyAccountAspect.java:

package com.zero4j.annotation;

import net.sf.json.JSONObject;

import org.aspectj.lang.annotation.Aspect;
import org.springframework.core.MethodParameter;
import org.springframework.stereotype.Component;
import org.springframework.web.bind.support.WebDataBinderFactory;
import org.springframework.web.context.request.NativeWebRequest;
import org.springframework.web.method.support.HandlerMethodArgumentResolver;
import org.springframework.web.method.support.ModelAndViewContainer;
import org.springframework.web.multipart.support.MissingServletRequestPartException;

import com.zero4j.model.account.Account;
import com.zero4j.model.token.util.TokenStaticUtil;

@Aspect
@Component
public class VerifyAccountAspect implements HandlerMethodArgumentResolver{

	@Override
	public boolean supportsParameter(MethodParameter parameter) {
		return parameter.hasParameterAnnotation(VerifyAccount.class);
	}

	@Override
	public Object resolveArgument(MethodParameter parameter, ModelAndViewContainer mavContainer, NativeWebRequest webRequest, WebDataBinderFactory binderFactory) throws Exception {
		
		String token = webRequest.getParameter("token");
		
		 JSONObject out = new JSONObject();
		
		if(token==null||token.equals("")){
			out.put("status", 401);
			out.put("message", "请先注册并登录后再进行此操作");
			out.put("debug", "缺少参数token或为空");
			//ResponseStaticUtil.write(response,out);
			System.out.println(out.toString());
			//return;
		}
		Account account = TokenStaticUtil.getAccount(token);
		if(account==null){
			out.put("status", 401);
			out.put("message", "请先注册并登录后再进行此操作");
			out.put("debug", "token对应的account为空");
			//ResponseStaticUtil.write(response,out);
			System.out.println(out.toString());
			throw new MissingServletRequestPartException("account");
			//return;
		}
		
		return account;
	}
	
}

注意要实现接口:HandlerMethodArgumentResolver

3、最后要在SpringMVC的配置java类中加入对应的代码:

package com.zero4j.config;

import java.util.List;

import org.springframework.context.annotation.Configuration;
import org.springframework.web.method.support.HandlerMethodArgumentResolver;
import org.springframework.web.servlet.config.annotation.WebMvcConfigurer;

import com.zero4j.annotation.VerifyAccountAspect;

@Configuration
public class WebAppConfigurer implements WebMvcConfigurer {


	@Override
	public void addArgumentResolvers(List<HandlerMethodArgumentResolver> resolvers) {
		
		resolvers.add(new VerifyAccountAspect());
		
		WebMvcConfigurer.super.addArgumentResolvers(resolvers);
	}

}

注意这行:resolvers.add(new VerifyAccountAspect());

Spring自定义注解(method)

先定义一个注解接口 VerifyToken.java :

package com.zero4j.annotation;

import java.lang.annotation.*;

@Target(ElementType.METHOD)
@Retention(RetentionPolicy.RUNTIME)
@Documented

public @interface VerifyToken {

	//权限参数
	String permission() default "";
	
}

再在同目录中定义一个切面类VerifyTokenAspect.java:

package com.zero4j.annotation;

import java.util.Enumeration;

import javax.servlet.http.HttpServletRequest;
import javax.servlet.http.HttpServletResponse;

import net.sf.json.JSONObject;

import org.aspectj.lang.ProceedingJoinPoint;
import org.aspectj.lang.annotation.Around;
import org.aspectj.lang.annotation.Aspect;
import org.aspectj.lang.annotation.Pointcut;
import org.springframework.stereotype.Component;
import org.springframework.web.context.request.RequestContextHolder;
import org.springframework.web.context.request.ServletRequestAttributes;

import com.zero4j.model.account.Account;
import com.zero4j.model.permission.util.PermissionStaticUtil;
import com.zero4j.model.token.util.TokenStaticUtil;
import com.zero4j.util.ResponseStaticUtil;

@Aspect
@Component
public class VerifyTokenAspect {

	@Pointcut("@annotation(com.zero4j.annotation.VerifyToken)")	//这是annotation对应类的所在位置,若目录不同,则填写完整路径,如:com.zero4j.annotation.VerifyToken
    private void pointcut(){
		
	}
	
	@Around("pointcut()&&@annotation(verifyToken)")
	public void around(ProceedingJoinPoint pjp, VerifyToken verifyToken) throws Throwable{
		
		//System.out.println("annotation执行前");
		
		//System.out.println("verifyToken.permission() = "+verifyToken.permission());
		
		ServletRequestAttributes attributes = (ServletRequestAttributes) RequestContextHolder.getRequestAttributes();
        HttpServletRequest request = attributes.getRequest();
        HttpServletResponse response = attributes.getResponse();
        
        String token = request.getParameter("token");
        
        JSONObject out = new JSONObject();
		
		if(token==null||token.equals("")){
			out.put("status", 401);
			out.put("message", "请先注册并登录后再进行此操作");
			out.put("debug", "缺少参数token或为空");
			ResponseStaticUtil.write(response,out);
			//System.out.println(out.toString());
			return;
		}
		Account account = TokenStaticUtil.getAccount(token);
		if(account==null){
			out.put("status", 401);
			out.put("message", "请先注册并登录后再进行此操作");
			out.put("debug", "token对应的account为空");
			ResponseStaticUtil.write(response,out);
			//System.out.println(out.toString());
			return;
		}
		
		if(!(verifyToken.permission()==null||verifyToken.permission().equals(""))){
			if(PermissionStaticUtil.verify(account.getId(), verifyToken.permission())==false){
				out.put("status", 403);
				out.put("message", "你无权进行本操作");
				out.put("debug", "你没有"+verifyToken.permission()+"权限");
				ResponseStaticUtil.write(response,out);
				//System.out.println(out.toString());
				return;
			}
		}
		
		if(out.size()==0){
			pjp.proceed();
		}

	}

}

最后在需要切入的地方加上注解即可:

	@VerifyToken(permission="adminLog_read")
	@RequestMapping(value="", method=RequestMethod.GET)
	public void list(HttpServletRequest request, HttpServletResponse response,
			@RequestParam(required=false) String token,
			@RequestParam(required=false) Integer offset,
			@RequestParam(required=false) Integer limit,
			@RequestParam(required=false) String startTime,
			@RequestParam(required=false) String endTime,
			@RequestParam(required=false) String accountNickname,
			@RequestParam(required=false) String accountMobile,
			@RequestParam(required=false) String description
		){
		
		........

		}


在J2EE中下载文件时使用中文名字的示例代码

    @RequestMapping(path = { "/downloadFromArchive" }, method={RequestMethod.GET})
    public ResponseEntity<byte[]> downloadFromArchive(HttpServletRequest request, HttpServletResponse response,
    			@RequestParam(required=false) String id
    		) throws IOException {
    	  
        HttpHeaders headers = new HttpHeaders();	//设置http协议头部
        
        if(id==null||id.equals("")){
        	return null;
        }
        
        Archive archive = this.archiveService.get(id);
        if(archive==null){
        	return null;
        }
        
        if(archive.getLink().indexOf(".")<0){
        	response.sendRedirect(archive.getLink());
        	return null;
        }
        String extension = archive.getLink().substring(archive.getLink().lastIndexOf("."));
        
        //System.out.println("archive.getTitle()"+archive.getTitle());
        //System.out.println("archive.getLink()"+archive.getLink());
        
        String fileName = archive.getTitle()+extension;
        //System.out.println("fileName = "+fileName);
        
        //获取文件在服务器上的绝对路径
		String filePath = archive.getLink();
		
		//假如路径为阿新制作的下载controller,则执行特殊的操作,filePath会根据阿新的逻辑去获取
		
			
		Pattern pattern = Pattern.compile(".*\\?archiveId=(.*?)&fileName=(.*)&randomName=(.*)");
		Matcher	matcher = pattern.matcher(archive.getLink());
		if(matcher.find()){
			System.out.println("正则匹配成功1");
			String archiveId = matcher.group(1);
			fileName = matcher.group(2);
			String randomName = matcher.group(3);
			filePath = "/uploads/archiveFile/"+archiveId+"/"+randomName;
			System.out.println("filePath" + filePath);
		}
		else{
			pattern = Pattern.compile(".*\\?archiveId=(.*?)&fileName=(.*)");
			matcher = pattern.matcher(archive.getLink());
			if(matcher.find()){
				System.out.println("正则匹配成功2");
				String archiveId = matcher.group(1);
				fileName = matcher.group(2);
				filePath = "/uploads/archiveFile/"+archiveId+"/"+fileName;
				System.out.println("filePath" + filePath);
			}else{}
		}


        File file = new File(this.servletContext.getRealPath("/") + filePath);
        
        if(!file.exists()){
        	System.out.println("目标下载文件不存在");
        	ResponseStaticUtil.write(response, "目标下载文件不存在");
    		return null;
        }
        //response.sendRedirect(filePath);
        
        
        //头部设置文件类型
        headers.setContentType(MediaType.APPLICATION_OCTET_STREAM);  
        //headers.setContentDispositionFormData("attachment", upload.getName());
		if(request.getHeader("User-Agent").toUpperCase().indexOf("MSIE") > 0) {	//IE浏览器UTF-8
			System.out.println("IE浏览器");
			headers.setContentDispositionFormData("attachment", fileName);
		}/*else if(request.getHeader("User-Agent").contains("Firefox")){	//火狐浏览器
			fileName="=?utf-8?b?"+new BASE64Encoder().encode(fileName.getBytes("utf-8"))+"?=";
		}*/else{	// 其他浏览器attachment;filename*=utf-8'zh_cn
			System.out.println("其他浏览器");
			response.setHeader("Content-Disposition", "attachment;fileName="+URLEncoder.encode(fileName,"utf-8")+"");// 重点
		}
        
        
		//返回文件字节数组
        /*try {
            return new ResponseEntity<byte[]>(FileUtils.readFileToByteArray(file),headers, HttpStatus.CREATED);
        } catch (IOException e) {
            e.printStackTrace();
            return null;    
        }*/
		InputStream in = new FileInputStream(file);  
        OutputStream out = response.getOutputStream();  
        byte[] b = new byte[1024];
        int length = 0;
        while((length = in.read(b)) != -1)  {  
            out.write(b,0,length);  
        }  
        in.close();  
        out.close();
        return null;
    }

有必要说一下,为什么没有使用FileUtils的readFileToByteArray方法,而是使用原始的out.write,因为前者在移动端中下载文件是不成功的(但奇怪的是在电脑端上却是正常的)。

close