标签: springcloud

  • SpringBoot2.1.1使用Zuul创建SpringCloud微服务Gateway网关

    1、在新的SpringBoot项目中的pom.xml引入如下依赖:

    		<!-- 引入Zuul starter -->
    		<dependency>
    			<groupId>org.springframework.cloud</groupId>
    			<artifactId>spring-cloud-starter-netflix-zuul</artifactId>
    		</dependency>
    		<dependency>
    			<groupId>org.springframework.cloud</groupId>
    			<artifactId>spring-cloud-starter</artifactId>
    		</dependency>
    		<!-- 连接Eureka -->
    		<dependency>
    			<groupId>org.springframework.cloud</groupId>
    			<artifactId>spring-cloud-starter-netflix-eureka-client</artifactId>
    		</dependency>

    2、在pom.xml的project中加入SpringCloud的版本管理配置:

    	<dependencyManagement>
    		<dependencies>
    			<dependency>
    				<groupId>org.springframework.cloud</groupId>
    				<artifactId>spring-cloud-dependencies</artifactId>
    				<version>${spring-cloud.version}</version>
    				<type>pom</type>
    				<scope>import</scope>
    			</dependency>
    		</dependencies>
    	</dependencyManagement>

    3、编辑配置文件application.propertites:

    spring.application.name = zero4j-zuul-gateway
    
    eureka.client.serviceUrl.defaultZone = http://admin:123456@localhost:8761/eureka/
    eureka.instance.instance-id = ${spring.cloud.client.ip-address}:${spring.application.name}:${server.port}
    eureka.instance.prefer-ip-address = true
    
    #只要访问以/api/v1/areas开头的多层目录都可以路由到服务名为zero4j-provider-area的服务上.
    zuul.routes.zero4j-provider-area.path = /api/v1/areas
    zuul.routes.zero4j-provider-area.service-id = zero4j-provider-area
    zuul.routes.zero4j-provider-area.stripPrefix = false
    
    server.port = 4000

    4、最后在application启动类中加入@EnableDiscoveryClient和@EnableZuulProxy注解:

    package com.zero4j;
    
    import org.springframework.boot.SpringApplication;
    import org.springframework.boot.autoconfigure.SpringBootApplication;
    import org.springframework.cloud.client.discovery.EnableDiscoveryClient;
    import org.springframework.cloud.netflix.zuul.EnableZuulProxy;
    
    @EnableDiscoveryClient
    @EnableZuulProxy
    @SpringBootApplication
    public class Zero4jZuulGatewayApplication {
    
    	public static void main(String[] args) {
    		SpringApplication.run(Zero4jZuulGatewayApplication.class, args);
    	}
    
    }


  • SpringBoot2.1.1微服务架构引入SpringCloudSecurity安全认证

    1、在eureka服务器的pom.xml中引入依赖:

    	<!-- Spring Cloud Security 依赖 -->
    	<dependency>
                <groupId>org.springframework.boot</groupId>
                <artifactId>spring-boot-starter-security</artifactId>
            </dependency>

    2、创建密码安全认证密码匹配规则类MyPasswordEncoder.java:

    package com.zero4j.config;
    
    import org.springframework.security.crypto.password.PasswordEncoder;
    
    public class MyPasswordEncoder implements PasswordEncoder {
    
    	@Override
        public String encode(CharSequence charSequence) {
            return charSequence.toString();
        }
    
        @Override
        public boolean matches(CharSequence charSequence, String s) {
            return s.equals(charSequence.toString());
        }
        
    }
    

    3、在eureka服务器中创建配置类SecurityConfig.java:

    package com.zero4j.config;
    
    import org.springframework.beans.factory.annotation.Autowired;
    import org.springframework.context.annotation.Bean;
    import org.springframework.context.annotation.Configuration;
    import org.springframework.security.crypto.bcrypt.BCryptPasswordEncoder;
    import org.springframework.security.crypto.factory.PasswordEncoderFactories;
    import org.springframework.security.crypto.password.PasswordEncoder;
    import org.springframework.security.config.annotation.authentication.builders.AuthenticationManagerBuilder;
    import org.springframework.security.config.annotation.web.builders.HttpSecurity;
    import org.springframework.security.config.annotation.web.configuration.EnableWebSecurity;
    import org.springframework.security.config.annotation.web.configuration.WebSecurityConfigurerAdapter;
    
    @Configuration
    @EnableWebSecurity
    public class SecurityConfig extends WebSecurityConfigurerAdapter {
        
    	@Bean
        public PasswordEncoder passwordEncoder() {
            return PasswordEncoderFactories.createDelegatingPasswordEncoder();
        }
        
        //@Autowired
        //BCryptPasswordEncoder passwordEncoder;
    
        @Override
        protected void configure(AuthenticationManagerBuilder auth) throws Exception {
        	
        	//以前可以不指定PasswordEncoder,但是新的SpringBoot依赖的SpringCloudScurity需要了
        	//auth.inMemoryAuthentication().withUser("admin").password("123456").roles("ADMIN");
        	//这样,密码以明文的方式进行匹配
        	auth.inMemoryAuthentication().passwordEncoder(new MyPasswordEncoder()).withUser("admin").password("123456").roles("ADMIN");
        	//auth.inMemoryAuthentication().withUser("admin").password(passwordEncoder.encode("123456")).roles("ADMIN");
        }
    
        @Override
        protected void configure(HttpSecurity http) throws Exception {
            http.csrf().ignoringAntMatchers("/eureka/**");
            super.configure(http);
        }
    }

    4、启动服务,访问eureka服务中心,使用admin:123456进行登录,成功进入eureka控制台

    5、对微服务提供者的application.propertites说引用的eureka服务中心地址的前面加入“admin:123456@”,如:http\://admin:123456@localhost\:8761/eureka/ ,然后启动即可~

  • SpringBoot2.1.1使用SpringCloud的Feign调用Eureka微服务并开启Hystrix熔断机制

    1、先在pom.xml中引入如下依赖:

    	<!--Netflix Eureka依赖-->
    	<dependency>
    		<groupId>org.springframework.cloud</groupId>
    		<artifactId>spring-cloud-starter-netflix-eureka-client</artifactId>
    	</dependency>
    	<dependency>
    		<groupId>org.springframework.cloud</groupId>
    		<artifactId>spring-cloud-starter-netflix-ribbon</artifactId>
    	</dependency>
    	<!--springcloud整合的openFeign-->
            <dependency>
                <groupId>org.springframework.cloud</groupId>
                <artifactId>spring-cloud-starter-openfeign</artifactId>
            </dependency>

    2、在pom.xml中的<project></project>之间增加以下关于springcloud的版本管理:

    	<dependencyManagement>
    		<dependencies>
    			<dependency>
    			<groupId>org.springframework.cloud</groupId>
    			<artifactId>spring-cloud-dependencies</artifactId>
    			<version>${spring-cloud.version}</version>
    			<type>pom</type>
    			<scope>import</scope>
    			</dependency>
    		</dependencies>
    	</dependencyManagement>

    3、在application.propertites中增加如下配置:

    #feign的配置,连接超时及读取超时配置
    feign.client.config.default.connectTimeout=5000
    feign.client.config.default.readTimeout=5000
    feign.client.config.default.loggerLevel=basic
    #开启熔断功能
    feign.hystrix.enabled=true

    4、在application启动入口增加@EnableFeignClients注解:

    @EnableFeignClients
    @ImportResource("classpath:hibernate.xml")
    @SpringBootApplication
    public class Zero4jApplication extends SpringBootServletInitializer{
    	
    	@Override
    	protected SpringApplicationBuilder configure(SpringApplicationBuilder builder) {
    		return builder.sources(Zero4jApplication.class);
    	}
    
    	public static void main(String[] args) {
    		SpringApplication.run(Zero4jApplication.class, args);
    	}
    
    }

    5、创建FeignClient客户端:

    package com.zero4j.controller.api.v1;
    
    import org.springframework.cloud.openfeign.FeignClient;
    import org.springframework.web.bind.annotation.DeleteMapping;
    import org.springframework.web.bind.annotation.GetMapping;
    import org.springframework.web.bind.annotation.PatchMapping;
    import org.springframework.web.bind.annotation.PathVariable;
    import org.springframework.web.bind.annotation.PostMapping;
    import org.springframework.web.bind.annotation.RequestParam;
    
    @FeignClient(value="zero4j-provider-area", fallback=AreasApiHystrixV1.class)
    public interface AreasApiFeignClientV1 {
    
    	@PatchMapping(value="api/v1/areas/{id}")
    	String update(
    			@PathVariable(value="id") String id,
    			@RequestParam(value="token",required=false) String token,
    			@RequestParam(value="name",required=false) String name,
    			@RequestParam(value="parentId",required=false) String parentId,
    			@RequestParam(value="hasChildren",required=false) Boolean hasChildren
    		);
    
    }
    

    6、编写调用微服务的Controller:

    package com.zero4j.controller.api.v1;
    
    import java.util.HashMap;
    import java.util.Map;
    
    import javax.servlet.http.HttpServletRequest;
    import javax.servlet.http.HttpServletResponse;
    
    import net.sf.json.JSONObject;
    
    import org.hibernate.SessionFactory;
    import org.springframework.beans.factory.annotation.Autowired;
    import org.springframework.http.HttpEntity;
    import org.springframework.http.HttpHeaders;
    import org.springframework.http.HttpMethod;
    import org.springframework.http.MediaType;
    import org.springframework.http.ResponseEntity;
    import org.springframework.web.bind.annotation.DeleteMapping;
    import org.springframework.web.bind.annotation.GetMapping;
    import org.springframework.web.bind.annotation.PatchMapping;
    import org.springframework.web.bind.annotation.PathVariable;
    import org.springframework.web.bind.annotation.PostMapping;
    import org.springframework.web.bind.annotation.RequestAttribute;
    import org.springframework.web.bind.annotation.RequestMapping;
    import org.springframework.web.bind.annotation.RequestParam;
    import org.springframework.web.bind.annotation.RestController;
    import org.springframework.web.client.RestTemplate;
    
    import com.zero4j.model.area.service.AreaService;
    
    
    @RestController
    @RequestMapping("/api/v1/areas")
    public class AreasApiControllerV1 {
    
    	@Autowired
    	private AreaService areaService;
    	
    	@Autowired
    	private SessionFactory sessionFactory;
    	
    	@Autowired
    	private RestTemplate restTemplate;
    	
    	@PatchMapping(value="/{id}")
    	public ResponseEntity update(HttpServletRequest request,HttpServletResponse response,
    			@PathVariable(value="id") String id,
    			@RequestParam(required=false) String token,
    			@RequestParam(required=false) String name,
    			@RequestParam(required=false) String parentId,
    			@RequestParam(required=false) Boolean hasChildren
    		){
    		
    		return ResponseEntity.ok((String)areaApiFeignClient.update(id,token,name,parentId,hasChildren));
    	}
    	
    
    }
    

    7、编写熔断处理方法:

    package com.zero4j.controller.api.v1;
    
    import net.sf.json.JSONObject;
    
    import org.springframework.stereotype.Component;
    
    @Component
    public class AreasApiHystrixV1 implements AreasApiFeignClientV1 {
    
    	@Override
    	public String update(String id, String token, String name, String parentId, Boolean hasChildren) {
    		JSONObject out = new JSONObject();
    		out.put("status", 400);
    		out.put("message", "update服务异常");
    		out.put("debug", "update服务异常");
    		return out.toString();
    	}
    
    }
    

    8、启动服务,访问对应的api,分别在微服务开启、关闭的时候调用API,查看结果即可。

  • 使用SpringBoot2.1.1配置SpringCloudConfig服务

    配置中心服务器:

    1、在pom.xml中加入如下依赖:

    	        <dependency>
    	        	<groupId>org.springframework.boot</groupId>
    	        	<artifactId>spring-boot-starter-web</artifactId>
    		</dependency>
    
    		<!-- Spring Cloud Config - Server依赖 -->
    		<dependency>
    			<groupId>org.springframework.cloud</groupId>
    			<artifactId>spring-cloud-config-server</artifactId>
    			<version>2.1.1.RELEASE</version>
    		</dependency>

    注意高亮行,这个version需要和springboot的版本号一致。

    2、在启动类中加入@EnableConfigServer注解

    3、创建bootstrap.yml配置文件,本地配置如下:

    #服务启动端口配置:
    server:  
      port: 3000
      
    #指定配置文件所在目录或地址
    spring:
      profiles:
        active: native
      cloud:
        config:
          server:
            native:
              search-locations: classpath:/config/
              #search-locations: D:/Workspaces/zero4j/config/src/main/resources/config

    4、在项目的resources(class)目录中创建config文件夹,并在里面新增application-dev.properties文件,内容如下:

    server.address=127.0.0.1
    server.port=8081
    a.url=dev1233

    5、启动并访问 http://localhost:3000/application-dev.properties,能看到

    配置客户端:

    1、在pom.xml中加入如下依赖:

    		<dependency>
                		<groupId>org.springframework.boot</groupId>
                		<artifactId>spring-boot-starter-web</artifactId>
            	</dependency>
    
    		<!-- Spring Cloud Config - Client依赖 -->
    		<dependency>
    			<groupId>org.springframework.cloud</groupId>
    			<artifactId>spring-cloud-config-client</artifactId>
    			<version>2.1.1.RELEASE</version>
    		</dependency>

    同样的,version那里切记要跟springboot的版本一致。

    2、创建bootstrap.yml配置文件,配置如下:

    #启动端口配置:
    server:  
      port: 8080
    
    # 指明配置服务中心的网址
    spring:
      application:
        name: application
      cloud:
        config:
          label: master
          profile: dev
          uri: http://127.0.0.1:3000

    3、创建测试用的controller

    package com.zero4j.controller;
    
    import org.springframework.beans.factory.annotation.Value;
    import org.springframework.web.bind.annotation.GetMapping;
    import org.springframework.web.bind.annotation.RestController;
    
    @RestController
    public class TestController {
    
    	@Value("${a.url}")
    	private String datUrl;
    	
    	@GetMapping(value = "/test")
    	public String hi(){
    		return datUrl;
    	}
    
    }
    

    4、启动并访问http://localhost:8081/test,便能看到client获取server的class中config里的配置文件对应的a.url配置

  • SpringBoot2.1.x+SpringCloud:Eureka(server+client)入门+高可用配置

    eureka

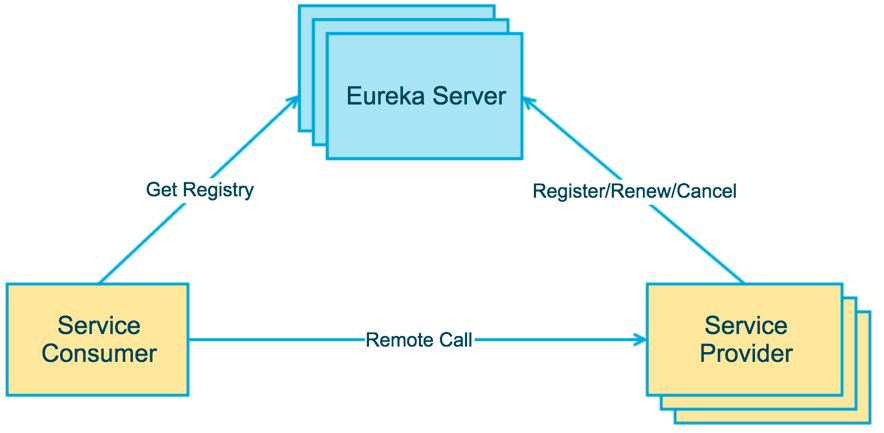
    一、Eureka服务器+Eureka服务提供者

    1、首先到https://start.spring.io/中创建版本为2.1.x项目,在本地的IDEA导入后,首先在pom.xml中增加以下依赖(在pom.xml的<dependencies></dependencies>之间):

    <!--Netflix Eureka依赖-->
    <dependency>
    	<groupId>org.springframework.cloud</groupId>
    	<artifactId>spring-cloud-starter-netflix-eureka-server</artifactId>
    </dependency>

    2、然后在pom.xml的<project></project>之间增加以下关于springcloud的版本管理:

    <dependencyManagement>
    	<dependencies>
    		<dependency>
    		<groupId>org.springframework.cloud</groupId>
    		<artifactId>spring-cloud-dependencies</artifactId>
    		<version>${spring-cloud.version}</version>
    		<type>pom</type>
    		<scope>import</scope>
    		</dependency>
    	</dependencies>
    </dependencyManagement>

    3、接着在在pom.xml的<properties></properties>中增加以下配置(注意:Greenwich对应的是springboot2.1.x版本,如果换成其他的会报错,就这个坑把我坑了一个下午):

    <spring-cloud.version>Greenwich.SR3</spring-cloud.version>

    4、还有在application.properties中增加如下配置:

    1)eureka服务器是这样配置的:

    server.port=8761
    
    spring.application.name=eureka-server-1
    
    #注册的域名(注意:可以使用localhost,但在高可用时,不同的eureka-server必须要使用不同的hostname,否则无法相互发现)
    eureka.instance.hostname=eureka-server-1
    #是否向注册中心注册自己(非高可用时为false,高可用时为true)
    eureka.client.registerWithEureka=true
    #是否从eureka上获取信息(非高可用时为false,高可用时为true)
    eureka.client.fetchRegistry=true
    #eureka通信地址(非高可用时写自己的eureka-server地址,高可用时填高可用的目标eureka-server地址)
    eureka.client.serviceUrl.defaultZone=http\://eureka-server-2\:8762/eureka/

    2)eureka服务提供者是这样配置的:

    server.port=8771
    
    spring.application.name=client1
    
    eureka.instance.prefer-ip-address=true
    #多个eureka-server时可用","号分隔
    eureka.client.serviceUrl.defaultZone=http\://localhost\:8761/eureka/

    5、最后在springboot的启动文件xxxApplication.java中增加对应的注解:

    1)eureka服务器要使用@EnableEurekaServer注解:

    package com.zero4j.eurekaserver;
    
    import org.springframework.boot.SpringApplication;
    import org.springframework.boot.autoconfigure.SpringBootApplication;
    import org.springframework.cloud.netflix.eureka.server.EnableEurekaServer;
    
    @EnableEurekaServer
    @SpringBootApplication
    public class EurekaServerApplication {
    
    	public static void main(String[] args) {
    		SpringApplication.run(EurekaServerApplication.class, args);
    	}
    
    }

    2)eureka服务器要使用@EurekaClient1Application注解:

    package com.zero4j.eurekaclient1;
    
    import org.springframework.boot.SpringApplication;
    import org.springframework.boot.autoconfigure.SpringBootApplication;
    import org.springframework.cloud.client.discovery.EnableDiscoveryClient;
    
    @SpringBootApplication
    @EnableDiscoveryClient   //也可以用EnableDiscoveryClient代替,前者兼容性更大,后者仅能兼容Eureka
    public class EurekaClient1Application {
    
    	public static void main(String[] args) {
    		SpringApplication.run(EurekaClient1Application.class, args);
    	}
    
    }


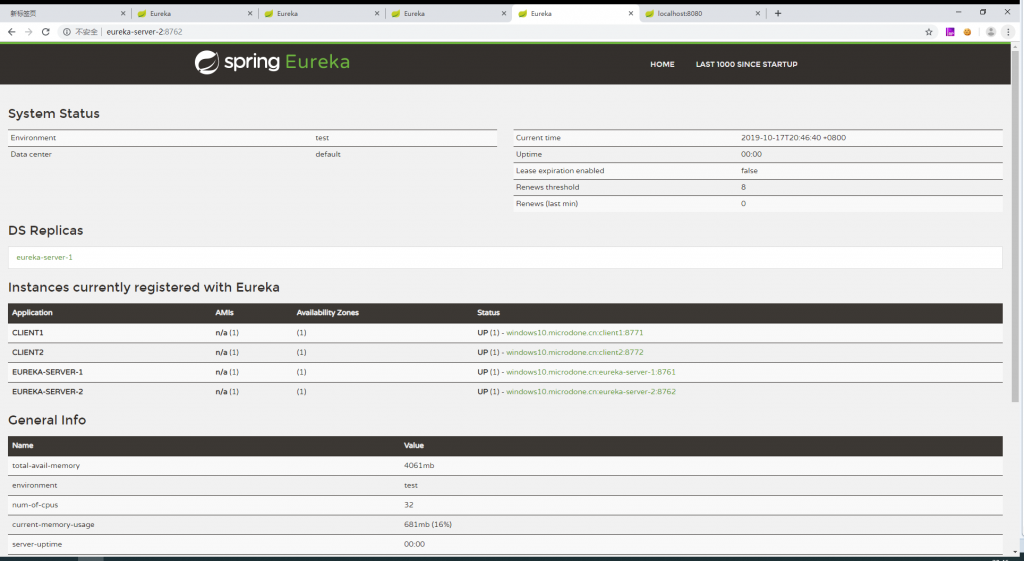
    访问eureka-server对应的端口,将会显示以下是最终的运行结果:

    123


    二、Eureka服务消费者的相关配置

    1、首先到https://start.spring.io/中创建版本为2.1.x项目,在本地的IDEA导入后,首先在pom.xml中增加以下依赖(在pom.xml的<dependencies></dependencies>之间):

    <!--Netflix Eureka依赖-->
    <dependency>
    	<groupId>org.springframework.cloud</groupId>
    	<artifactId>spring-cloud-starter-netflix-eureka-client</artifactId>
    </dependency>
    <dependency>
    	<groupId>org.springframework.boot</groupId>
    	<artifactId>spring-boot-starter-web</artifactId>
    </dependency>
    <dependency>
    	<groupId>org.springframework.cloud</groupId>
    	<artifactId>spring-cloud-starter-netflix-ribbon</artifactId>
    </dependency>

    2、然后在pom.xml的<project></project>之间增加以下关于springcloud的版本管理:

    <dependencyManagement>
    	<dependencies>
    		<dependency>
    		<groupId>org.springframework.cloud</groupId>
    		<artifactId>spring-cloud-dependencies</artifactId>
    		<version>${spring-cloud.version}</version>
    		<type>pom</type>
    		<scope>import</scope>
    		</dependency>
    	</dependencies>
    </dependencyManagement>

    3、接着在在pom.xml的<properties></properties>中增加以下配置(注意:Greenwich对应的是springboot2.1.x版本,如果换成其他的会报错,就这个坑把我坑了一个下午):

    <spring-cloud.version>Greenwich.SR3</spring-cloud.version>

    4、还有在application.properties中增加如下配置:

    #消费者端口
    server.port=8081
    spring.application.name=eureka-consumer-1
    eureka.instance.hostname=localhost
    eureka.client.service-url.defaultZone=http\://localhost\:8761/eureka/,http\://localhost\:8762/eureka/

    5、创建RestTemplate模板配置

    package com.zero4j.config;
    
    import org.springframework.cloud.client.loadbalancer.LoadBalanced;
    import org.springframework.context.annotation.Bean;
    import org.springframework.context.annotation.Configuration;
    import org.springframework.web.client.RestTemplate;
    
    @Configuration
    public class RestTemplateConfig {
    	
    	/**
         * RestTemplate:提供了多种便捷访问远程Http服务的方法
         * 是一种简单便捷访问Restful服务模板类,提供用于访问Rest服务的客户端模板类
         */
        @Bean
        @LoadBalanced
        public RestTemplate restTemplate(){
            return new RestTemplate();
        }
        
    }
    

    6、消费者调用eureka服务示例

    package com.zero4j.controller;
    
    import java.util.Random;
    
    import org.springframework.beans.factory.annotation.Autowired;
    import org.springframework.web.bind.annotation.GetMapping;
    import org.springframework.web.bind.annotation.RequestMapping;
    import org.springframework.web.bind.annotation.RestController;
    import org.springframework.web.client.RestTemplate;
    
    @RestController
    @RequestMapping("/")
    public class TestControllerProvider {
    	
    	@Autowired
        private RestTemplate restTemplate;
    
    	@GetMapping("/test")
        public String test() {
    		
    		//通过服务提供者名称调用
    		//List<Dept> depts = restTemplate.getForObject("http://wzx-spring-cloud-provider/dept/findAll", List.class);
    		//return depts;
    		
    		String test = restTemplate.getForObject("http://eureka-client-1/test", String.class);
    		
    		return test;
        }
    	
    }
    

    7、服务提供者的java示例

    package com.zero4j.controller;
    
    import java.util.Random;
    
    import org.springframework.web.bind.annotation.GetMapping;
    import org.springframework.web.bind.annotation.RequestMapping;
    import org.springframework.web.bind.annotation.RestController;
    
    @RestController
    @RequestMapping("/")
    public class TestControllerProvider {
    
    	@GetMapping("/test")
        public String test() {
            return "服务提供者1:"+String.valueOf((new Random()).nextInt());
        }
    	
    }