• Monthly Archives: 9月 2023

树莓派zero w在烧录好镜像后配置wifi

方法一:

用读卡器读取刚刚烧录好的SD卡,然后再SD卡的根目录创建一个文件:wpa_supplicant.conf

country=CN
update_config=1
ctrl_interface=DIR=/var/run/wpa_supplicant GROUP=netdev

network={
	ssid="RaspberryPi-OpenWrt"
	psk="woshishabi"
	key_mgmt=WPA-PSK
}
  • ssid:WiFi的名称
  • psk:WiFi的密码
  • key_mgmt:加密方式,以实际情况填写,家用目前通常为WPA/WPA2,我这里填写WPA-PSK即可。

注意保存的时候要用unix的文件格式,不然不生效。

方法二:

直接在pi zero中修改文件“/etc/wpa_supplicant/wpa_supplicant.conf”并在末尾添加如下代码:

network{
	ssid="z"                 #WIFI名
	psk="helloworld123"         #WIFI密码
	scan_ssid=1
}

其他

记得重启,然后可以使用以下命令来查看是否wifi已经生效:

ifconfig wlan0

如果仍然连接不上,可以使用以下指令查看pi所能scan得到的所有WIFI:

sudo iwlist wlan0 scan | grep ESSID

注意:zero的wifi是2.4G的,如果你的路由器wifi是5G的,则会出现scan不到的情况。

JBOSS EAP 7.4 修改在standalone下默认的HTTPS证书

jboss在standalone模式下的配置文件是在/standalone/configuration/standalone.xml,所以接下来的操作都在这个文件中进行。

确认JBOSS的HTTPS启用情况

打开配置文件,确保以下配置中的https的配置是存在的,且是你想要的:

    <socket-binding-group name="standard-sockets" default-interface="public" port-offset="${jboss.socket.binding.port-offset:0}">
        <socket-binding name="ajp" port="${jboss.ajp.port:8009}"/>
        <socket-binding name="http" port="${jboss.http.port:8080}"/>
        <socket-binding name="https" port="${jboss.https.port:8443}"/>
        <socket-binding name="management-http" interface="management" port="${jboss.management.http.port:9990}"/>
        <socket-binding name="management-https" interface="management" port="${jboss.management.https.port:9993}"/>
        <socket-binding name="txn-recovery-environment" port="4712"/>
        <socket-binding name="txn-status-manager" port="4713"/>
        <outbound-socket-binding name="mail-smtp">
            <remote-destination host="${jboss.mail.server.host:localhost}" port="${jboss.mail.server.port:25}"/>
        </outbound-socket-binding>
    </socket-binding-group>

配置你的SSL证书

找到security-realms对应的配置:

        <security-realms>
            <security-realm name="ManagementRealm">
                <authentication>
                    <local default-user="$local" skip-group-loading="true"/>
                    <properties path="mgmt-users.properties" relative-to="jboss.server.config.dir"/>
                </authentication>
                <authorization map-groups-to-roles="false">
                    <properties path="mgmt-groups.properties" relative-to="jboss.server.config.dir"/>
                </authorization>
            </security-realm>
            <security-realm name="ApplicationRealm">
                <server-identities>
                    <ssl>
                        <keystore path="application.keystore" relative-to="jboss.server.config.dir" keystore-password="password" alias="server" key-password="password" generate-self-signed-certificate-host="localhost"/>
                    </ssl>
                </server-identities>
                <authentication>
                    <local default-user="$local" allowed-users="*" skip-group-loading="true"/>
                    <properties path="application-users.properties" relative-to="jboss.server.config.dir"/>
                </authentication>
                <authorization>
                    <properties path="application-roles.properties" relative-to="jboss.server.config.dir"/>
                </authorization>
            </security-realm>
        </security-realms>

在security-realms内增加你的security-realm,如:MySecurityRealm(其实以下代码是拷贝ApplicationRealm后修改其keystore的配置以及增加了truststore的配置,具体见高亮行)

            <security-realm name="MySecurityRealm">
                <server-identities>
                    <ssl>
                        <keystore path="D:\xxx\yourKeyStore.jks" keystore-password="123456" alias="yourKeyAlias" key-password="123456"/>
                    </ssl>
                </server-identities>
                <authentication>
                    <local default-user="$local" allowed-users="*" skip-group-loading="true"/>
                    <properties path="application-users.properties" relative-to="jboss.server.config.dir"/>
                    <truststore path="D:\xxx\yourKeyStore.jks" keystore-password="123456"/>
                </authentication>
                <authorization>
                    <properties path="application-roles.properties" relative-to="jboss.server.config.dir"/>
                </authorization>
            </security-realm>

修改你需要配置的subsystem对应的security-realm

大家一般都是根目录部署,所以一般是搜索“default-host”关键字来找到对应的subsystem。

        <subsystem xmlns="urn:jboss:domain:undertow:12.0" default-server="default-server" default-virtual-host="default-host" default-servlet-container="default" default-security-domain="other" statistics-enabled="${wildfly.undertow.statistics-enabled:${wildfly.statistics-enabled:false}}">
            <buffer-cache name="default"/>
            <server name="default-server">
                <http-listener name="default" socket-binding="http" redirect-socket="https" enable-http2="true"/>
                <https-listener name="https" socket-binding="https" security-realm="ApplicationRealm" enable-http2="true"/>
                <host name="default-host" alias="localhost">
                    <location name="/" handler="welcome-content"/>
                    <http-invoker security-realm="ApplicationRealm"/>
                </host>
            </server>
            <servlet-container name="default">
                <jsp-config/>
                <websockets/>
            </servlet-container>
            <handlers>
                <file name="welcome-content" path="${jboss.home.dir}/welcome-content"/>
            </handlers>
        </subsystem>

从上述代码片段中可以找到对应的“security-realm”的名称是“ApplicationRealm”,将他修改成“MySecurityRealm”。

重启JBOSS

重启以让配置生效。

自制用于HTTPS的SSL证书,包括CA根证书以及在Spring Boot和Nginx中使用的证书

主体角色又三个:客户端、服务端、以及CA机构。

如下图所示:

CA机构根证书

生成CA机构私钥

openssl genrsa -out ca.key 2048

生成CA证书(注意:生成过程中需要输入一些CA机构的信息)

openssl req -x509 -new -key ca.key -out ca.crt

生成Server端证书

生成Server端的key私钥

openssl genrsa -out server.key 2048

生成Server端的csr证书请求文件(注意:生成过程中需要你输入一些服务端信息)

openssl req -new -key server.key -out server.csr

#注意到这一步时的意思
Please enter the following 'extra' attributes
to be sent with your certificate request
A challenge password []:  ##加密CA证书的密码,也要记住,可不输入
An optional company name []:  ##可以不输入

使用CA证书生成Server端的crt证书

openssl x509 -req -sha256 -in server.csr -CA ca.crt -CAkey ca.key -CAcreateserial -days 3650 -out server.crt

转换成用于SpringBoot的P12证书

使用Server端的key和crt转换p12(注意:-name 后面的参数对应的是证书的alias别名)

openssl pkcs12 -export -in server.crt -inkey server.key -out server.p12 -name "server"

把ca证书放到keystore中(非必要)

keytool -importcert -keystore server.p12 -file ca.crt

将p12证书转换成jks证书(例如jboss用到的)

keytool -importkeystore -srckeystore server.p12 -srcstoretype PKCS12 -deststoretype JKS -destkeystore server.jks

将crt证书转换成cer证书

双击打开*.crt证书文件:

在证书导出向导窗口点击【下一步】,选择Base-64编码的X.509(.CER),点击【下一步】:

然后按提示操作,即可完成转换。

树莓派4B使开放热点共享物联网4G模块的网络

第一步:hostapd

安装hostapd

sudo apt install hostapd
sudo systemctl stop hostapd

编辑“/etc/hostapd/hostapd.conf”文件(若无,则创建):

interface=wlan0
driver=nl80211
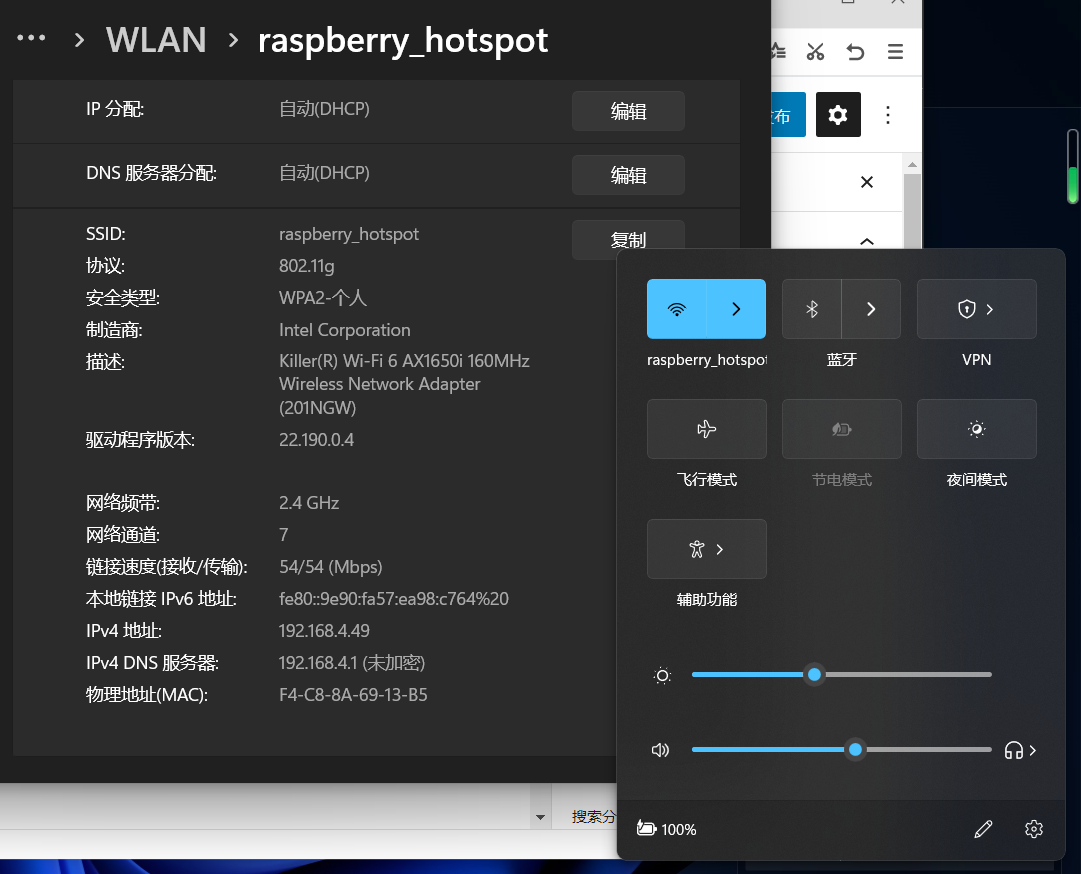
ssid=raspberry_hotspot
hw_mode=g
channel=7
wmm_enabled=0
macaddr_acl=0
auth_algs=1
ignore_broadcast_ssid=0
wpa=2
wpa_passphrase=12345678
wpa_key_mgmt=WPA-PSK
wpa_pairwise=TKIP
rsn_pairwise=CCMP

启动服务:

sudo systemctl unmask hostapd
sudo systemctl enable hostapd
sudo systemctl start hostapd

过一会,就能在其他移动设备中搜索到该热点了,只是此时能连接该热点,但是还不能上网,因为相关的dns设置没有配好。

如果服务启动失败,比如报错 "systemctl status hostapd.service" and "journalctl -xe" for details 等,可以按如下步骤逐一排查: 1. 重启树莓派,再尝试启动 hostapd 2. 命令行执行 sudo /usr/sbin/hostapd /etc/hostapd/hostapd.conf,直接运行 hostapd,观察输出日志,一般都能发现问题。比如常见的: 1. hostapd.conf 配置错误导致启动失败。检查配置文件,修改后,新启动 hostapd 即可。 2. wlan0 端口未开启导致启动失败。执行 sudo ifconfig wlan0 up 开启端口后,重新启动 hostapd 即可。

第二步:配置dhcp

编辑“/etc/dhcpcd.conf”,在文件末尾添加如下代码:

interface wlan0
    static ip_address=192.168.4.1/24
    nohook wpa_supplicant

意思是将树莓派的地址设置为192.168.4.1:

接着重启dhcpcd服务:

sudo systemctl restart dhcpcd

然后执行“ifconfig”命令,便可以看到wlan0的地址为192.168.4.1:

第三步:dnsmasq

dnsmasq 是一个小型的用于配置 DNS 和 DHCP 的工具,适用于小型网络,它提供了 DNS 和 DHCP 功能。

首先安装dnsmasq服务:

sudo apt install dnsmasq
sudo systemctl stop dnsmasq

编辑“/etc/dnsmasq.conf”文件(若无此文件则新建即可),内容如下:

interface=wlan0
dhcp-range=192.168.4.20,192.168.4.50,255.255.255.0,24h
server=8.8.8.8
server=8.8.4.4

dhcp-range 配置项的意思是,dhcp 服务会给客户端分配 192.168.4.20 到 192.168.4.50 的 IP 空间,24 小时租期。

然后重启 dnsmasq 服务:

sudo systemctl reload dnsmasq

第四步:配置iptables转发

开启 Linux 内核的 ip 转发功能,编辑“/etc/sysctl.conf”系统配置文件,去掉 net.ipv4.ip_forward=1 这个配置项的注释:

添加路由转发规则(注意:eth0为网线口,需要视情况更换成访问网络的端口,如“usb0”):

sudo iptables -t nat -A  POSTROUTING -o eth0 -j MASQUERADE
sudo iptables -A FORWARD -i eth0 -o wlan0 -m state --state RELATED,ESTABLISHED -j ACCEPT
sudo iptables -A FORWARD -i wlan0 -o eth0 -j ACCEPT

设置开机时自动导入防火墙规则(将刚刚设置的这些规则应用于我们的每一次启动):

sudo sh -c "iptables-save > /etc/iptables.ipv4.nat"

编辑“/etc/rc.local”,把“iptables-restore < /etc/iptables.ipv4.nat”加到最后一行“exit 0”的前面:

第五步:重启树莓派

sudo reboot

其他

若dnsmasq经常会出现问题,原因可能是wlan0还没热启动完成,而dnsmasq就先启动了,所以出现了启动失败的现象,可以尝试以下操作(未验证):

// 打开管理启动
sudo vim /etc/rc.local
// 添加如下行,在 exit 0 之前
sudo bash /etc/dnsmasq_delayinit.sh
// 然后编辑dnsmasq_delayinit.sh
sudo vim /etc/dnsmasq_delayinit.sh
#!/bin/sh
sleep 10
sudo service dnsmasq restart
// 再设置成可执行
sudo chmod +x /etc/dnsmasq_delayinit.sh
close