• Category Archives: Java

SpringBoot2+JPA引入对Redis的支持

在pom.xml加入:

        <!-- 对Redis的支持 -->
        <dependency>
            <groupId>org.springframework.boot</groupId>
            <artifactId>spring-boot-starter-data-redis</artifactId>
        </dependency>

增加配置文件RedisConfig.java:

package com.zero4j.config;

import com.fasterxml.jackson.annotation.JsonAutoDetect;
import com.fasterxml.jackson.annotation.PropertyAccessor;
import com.fasterxml.jackson.databind.ObjectMapper;
import org.springframework.cache.CacheManager;
import org.springframework.cache.annotation.CachingConfigurerSupport;
import org.springframework.cache.annotation.EnableCaching;
import org.springframework.cache.interceptor.KeyGenerator;
import org.springframework.context.annotation.Bean;
import org.springframework.context.annotation.Configuration;
import org.springframework.data.redis.cache.RedisCacheManager;
import org.springframework.data.redis.connection.RedisConnectionFactory;
import org.springframework.data.redis.core.RedisTemplate;
import org.springframework.data.redis.core.StringRedisTemplate;
import org.springframework.data.redis.serializer.Jackson2JsonRedisSerializer;

import java.lang.reflect.Method;

/**
 * Redis 缓存配置类(通用)
 * @author linhongcun
 *
 */
@Configuration
@EnableCaching
public class RedisConfig extends CachingConfigurerSupport {

    /**
     * 缓存对象集合中,缓存是以 key-value 形式保存的。当不指定缓存的 key 时,SpringBoot 会使用 SimpleKeyGenerator 生成 key。
     * @return
     */
    @Bean
    public KeyGenerator wiselyKeyGenerator() {
        return new KeyGenerator() {
            @Override
            public Object generate(Object target, Method method, Object... params) {
                StringBuilder sb = new StringBuilder();
                sb.append(target.getClass().getName());
                sb.append(method.getName());
                for (Object obj : params) {
                    sb.append(obj.toString());
                }
                return sb.toString();
            }
        };

    }

    @Bean
    public CacheManager cacheManager(RedisConnectionFactory factory) {
    	return RedisCacheManager.create(factory);
    }

    @Bean
    public RedisTemplate<String, String> redisTemplate(RedisConnectionFactory factory) {
        StringRedisTemplate template = new StringRedisTemplate(factory);
        @SuppressWarnings({ "rawtypes", "unchecked" })
        Jackson2JsonRedisSerializer jackson2JsonRedisSerializer = new Jackson2JsonRedisSerializer(Object.class);
        ObjectMapper om = new ObjectMapper();
        om.setVisibility(PropertyAccessor.ALL, JsonAutoDetect.Visibility.ANY);
        om.enableDefaultTyping(ObjectMapper.DefaultTyping.NON_FINAL);
        jackson2JsonRedisSerializer.setObjectMapper(om);
        template.setValueSerializer(jackson2JsonRedisSerializer);
        template.afterPropertiesSet();
        return template;
    }
}

在application.properties中加入:

# Redis
spring.redis.host=127.0.0.1
spring.redis.port=6379

对Service类加入注解@CacheConfig和@Cacheable,如:

package com.zero4j.model.config;

import java.util.List;

import org.springframework.cache.annotation.CacheConfig;
import org.springframework.cache.annotation.Cacheable;
import org.springframework.data.jpa.repository.JpaRepository;
import org.springframework.data.jpa.repository.Query;
import org.springframework.stereotype.Repository;

@Repository
@CacheConfig(cacheNames = "configRepository")
public interface ConfigRepository extends JpaRepository<Config, String> {

	@Query("SELECT config FROM Config config")
	@Cacheable(value = "findAll",keyGenerator="wiselyKeyGenerator")
	List<Config> findAll();
	
}
 

研究SpringBoot与非SpringBoot项目以及搭配MyBatis/JPA/Hibernate的并发性能浅度测试

测试环境服务器参数:

CPU:4核8G带宽200M
RDS:1核1G
操作系统:Linux
JDK版本:1.8
WEB容器:Tomcat 8
压测工具:JMeter 3.2

每个组合分别的test内容基本如下(根据搭配的数据库不同,有些方法命名稍有差异):

@Controller
@RequestMapping("")
public class RootController {
	
	@Autowired
    private UserService userService;
	
	@RequestMapping(value={"","/","/index"})
	String view(Map<String, Object> map){
    	
    	System.out.println("首页(default)");
    	
    	map.put("name", "SpringBoot");
		map.put("date", new SimpleDateFormat("yyyy-MM-dd HH:mm:ss").format(new Date()));
    	
  		return "index.jsp";
  		
  	}
	
	@RequestMapping(value={"test1"})
	@ResponseBody
	String test() {

		String str = "(new Random()).nextInt() = "+(new Random()).nextInt();
		
		System.out.println(str);
		
		return str;
		
    }
	
	@RequestMapping(value="test2")
  	public void test2(HttpServletRequest request, HttpServletResponse response) {

		String str = "(new Random()).nextInt() = "+(new Random()).nextInt();
		
		System.out.println(str);
		
		ResponseStaticUtil.write(response, str);
  	}
	
	@RequestMapping(value={"get1"})
	@ResponseBody
	String get1() {

		User user = this.userService.get(1);
		String str = "user = "+user.getName()+" / (new Random()).nextInt() = "+(new Random()).nextInt();
		
		System.out.println(str);
		
		return str;
		
    }
	
  	@RequestMapping(value="get2")
  	public void get2(HttpServletRequest request, HttpServletResponse response) {
  		
  		User user = this.userService.get(1);
		String str = "user = "+user.getName()+" / (new Random()).nextInt() = "+(new Random()).nextInt();
		
		System.out.println(str);
  		
  		ResponseStaticUtil.write(response, str);
  	}
	
	@RequestMapping(value={"list1"})
	@ResponseBody
	String list() {

		List<User> users = this.userService.listAll();
		String str = "users.size()= "+users.size()+" / (new Random()).nextInt() = "+(new Random()).nextInt();
		System.out.println(str);
		
		return str;
		
    }
	
	@RequestMapping(value="list2")
  	public void list2(HttpServletRequest request, HttpServletResponse response) {

		List<User> users = this.userService.listAll();
		String str = "users.size()= "+users.size()+" / (new Random()).nextInt() = "+(new Random()).nextInt();
		System.out.println(str);
		
		ResponseStaticUtil.write(response, str);
		
    }
	
}


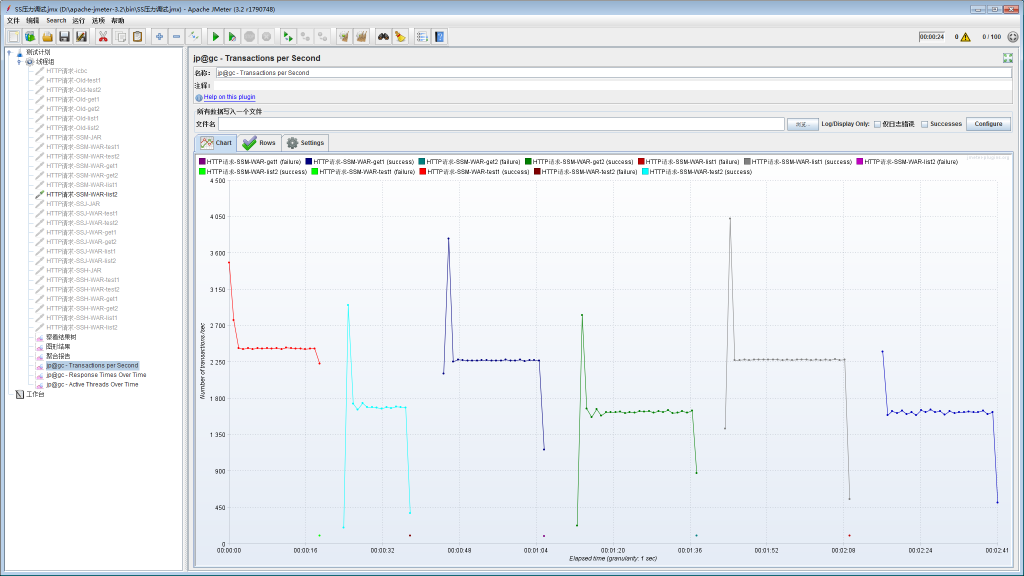
普通SpringMVC+Hibernate项目的各Controller压力测试结果:
123

SpringBoot+MyBatis项目的各Controller压力测试结果:
SpringBoot+Hibernate项目的各Controller压力测试结果


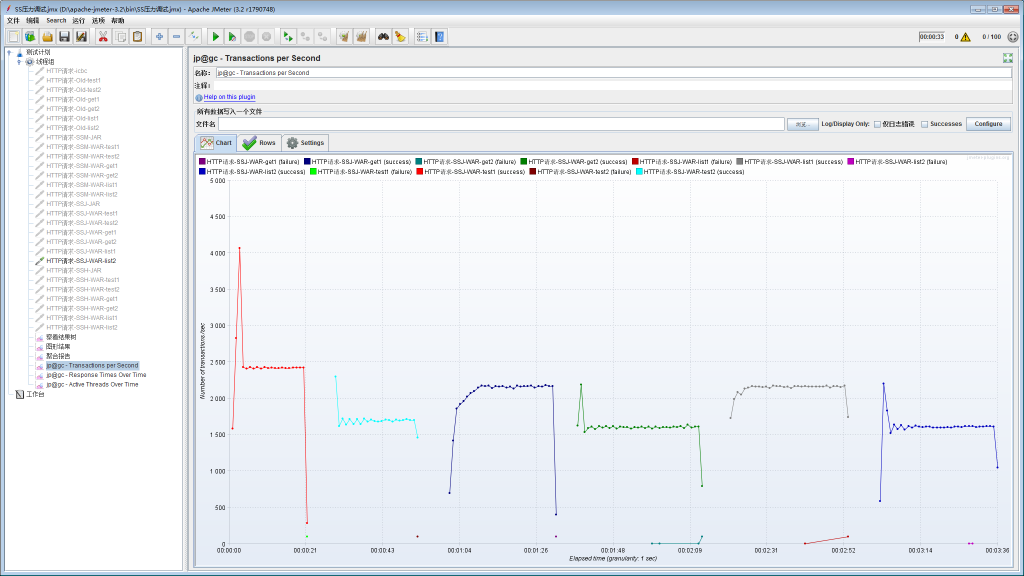
SpringBoot+JPA项目的各Controller压力测试结果:
123

SpringBoot+Hibernate项目的各Controller压力测试结果:
123


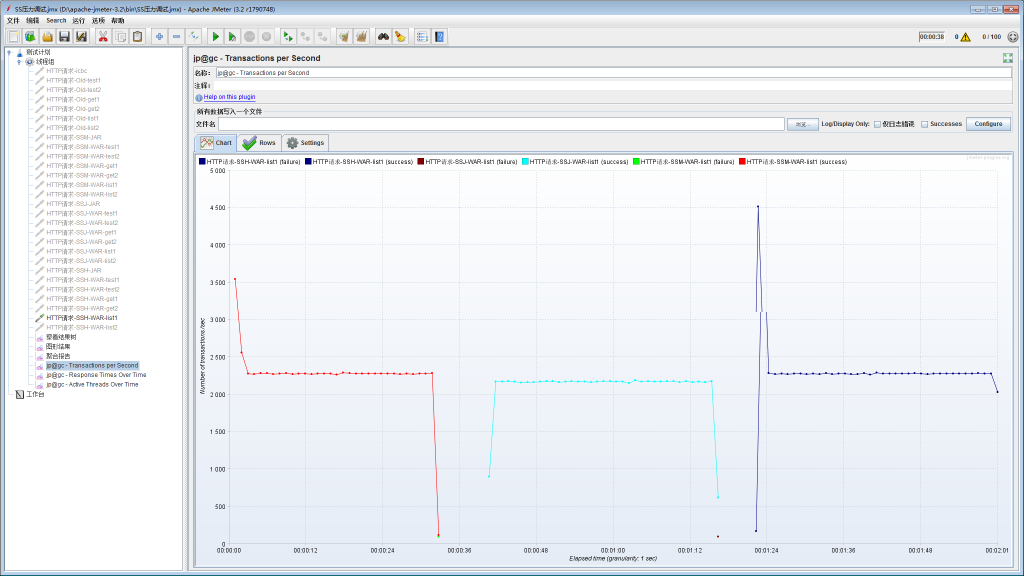
” SpringBoot+MyBatis / SpringBoot+JPA / SpringBoot+Hibernate ” 的get单个user对象压力测试对比:
" SpringBoot+MyBatis / SpringBoot+JPA / SpringBoot+Hibernate " 的get单个user对象压力测试对比

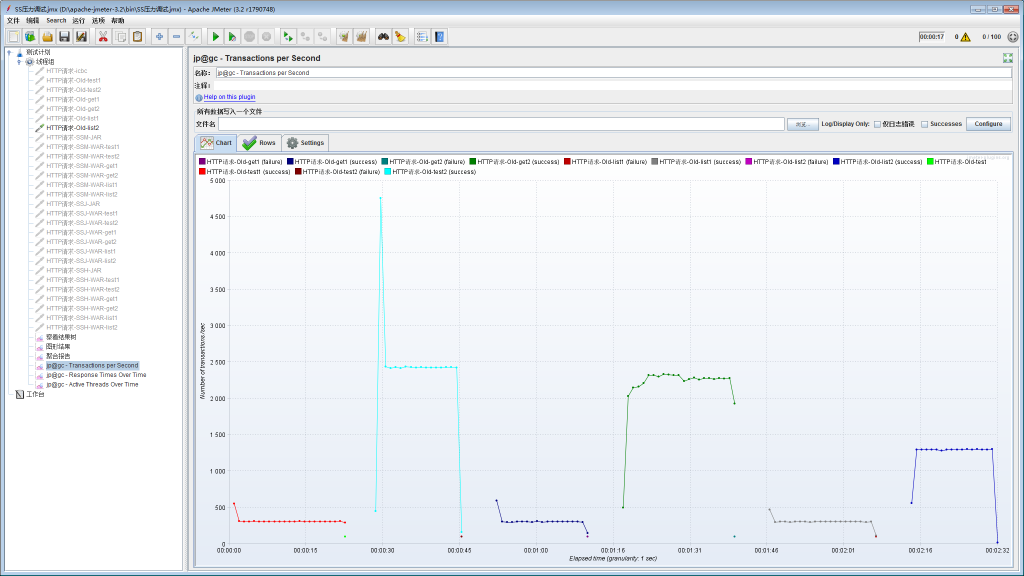
” SpringBoot+MyBatis / SpringBoot+JPA / SpringBoot+Hibernate ” 的获取user所有对象(只有3个数据)压力测试对比:
" SpringBoot+MyBatis / SpringBoot+JPA / SpringBoot+Hibernate " 的获取user所有对象(只有3个数据)压力测试对比


总结:

1、在写Controller方法时,普通SpringMVC框架在使用普通的response.write的方式时效率很高,但使用annotation的方式返回数据时效率十分低;反之,使用SpringBoot框架在使用annotation的方式返回数据时效率比传统的response.write方式的运行效率要高出一截。

2、在SpringBoot框架下搭配分别搭配MyBatis、JPA、Hibernate时,其运行效率的差异不大,JPA的方式稍弱一点点。


本文属于“cp锋”的原创,虽然内容不是十分精品,但还望尊重本人的研究成果,转发时请注明转载并带上本页面链接,感谢~

Spring boot设置文件上传大小限制

Spring Boot做文件上传时出现了报错

The field file exceeds its maximum permitted size of 1048576 bytes

显示文件的大小超出了允许的范围。查看了官方文档,原来Spring Boot工程嵌入的tomcat限制了请求的文件大小默认为1MB,单次请求的文件的总数不能大于10Mb.要更改这个默认值需要在配置文件(如application.properties)中加入两个配置.

springboot 1.4之前是这样的:

multipart.maxFileSize = 10485760       //单个文件的大小
multipart.maxRequestSize = 10485760     //单次请求的文件的总大小

springboot 1.4之后是这样的:

spring.http.multipart.maxFileSize = 10485760
spring.http.multipart.maxRequestSize = 10485760

springboot 2.0之后是这样的:

spring.servlet.multipart.max-file-size = 10485760
spring.servlet.multipart.max-request-size = 10485760

注意:很多其他网站是让你们用10Mb这样的形式去赋值的,但事实上这样会报错,这里的单位是以字节b为单位的,我们可以调成他原来的1048576 bytes的10倍,也就是10MB大概等于10485760

JAVA的各种HTTP/HTTPS模拟请求使用经验汇总

https:

try{


		StringBuffer reultBuffer = new StringBuffer();
			
		KeyStore keyStore  = KeyStore.getInstance("PKCS12");
		FileInputStream instream = new FileInputStream(new File("/home/certificate/apiclient_cert.p12"));
	        String passwordssss=mch_id;
	        keyStore.load(instream, passwordssss.toCharArray());	//证书密码
	        instream.close();
	        SSLContext sslcontext = SSLContexts.custom().loadKeyMaterial(keyStore, passwordssss.toCharArray()).build();	//证书密码(初始是商户ID)
	        SSLConnectionSocketFactory sslsf = new SSLConnectionSocketFactory(sslcontext,new String[] { "TLSv1" },null,SSLConnectionSocketFactory.BROWSER_COMPATIBLE_HOSTNAME_VERIFIER);
	        
		HttpPost httpPost = new HttpPost("https://fraud.mch.weixin.qq.com/risk/getpublickey");
	        CloseableHttpClient httpclient = HttpClients.custom().setSSLSocketFactory(sslsf).build();
	        httpPost.setHeader("Content-Type", "text/xml; charset=UTF-8");
	        httpPost.setEntity(new StringEntity(str_lingqian.toString(),"UTF-8"));
	        
	        CloseableHttpResponse response      = null;
	        InputStream inputStream		        = null;
	        InputStreamReader inputStreamReader = null;
	        BufferedReader bufferedReader       = null;
	        try {
	        	response = httpclient.execute(httpPost);
	        	HttpEntity entity = response.getEntity();
				if (entity!=null){
					inputStream = entity.getContent();
					inputStreamReader = new InputStreamReader(inputStream,"UTF-8");
					bufferedReader = new BufferedReader(inputStreamReader);
					String str = null;
					while ((str = bufferedReader.readLine()) != null) {
						reultBuffer.append(str);
						System.out.println(str);
					}
				}
			} catch (ClientProtocolException e) {
				e.printStackTrace();
			} catch (IOException e) {
				e.printStackTrace();
			}finally{

				httpclient.close();
				response.close();
				bufferedReader.close();
				inputStreamReader.close();
				inputStream.close();
				inputStream = null;
			}
	     
	        Document document = DocumentHelper.parseText(reultBuffer.toString());
	        Element rootElm = document.getRootElement();
	        if(rootElm.elementText("return_code").toString().equals("SUCCESS") && rootElm.elementText("result_code").toString().equals("SUCCESS") ){
	        	pub_key = rootElm.elementText("pub_key").toString();
	        	System.out.println("pub_key = "+pub_key);
	        }else{	        	
	        	return status;
	        }
			
}catch(Exception e){
	e.printStackTrace();
}


通过正则表达式在中设置不包含的页面

比如写如下的配置文:
<filter-mapping>
<filter-name>AdminFilter</filter-name>
<url-pattern>/admin/*</url-pattern>
</filter-mapping>
那么admin目录下所有的文件都将在访问前被过滤器拦截,包括login.jsp。

我们可以自己在 Filter 里用正则表达式进行二次过滤,过滤的正则表达式可以通过:

<filter>
	<filter-name>LoginFilter</filter-name>
	<filter-class>com.test.LoginFilter</filter-class>
	<init-param>
		<param-name>UrlRegx</param-name>
		<param-value><!--你的正则表达式--></param-value>
	</init-param>
</filter>


CAS返回更多用户信息

1.修改deployerConfigContext.xml文件


2.修改casServiceValidationSuccess.jsp文件


3.最后修改client端的web.xml文件:

	<!-- ======================== 单点登录开始 ======================== -->
	<!-- 用于单点退出,该过滤器用于实现单点登出功能,可选配置 -->
	<listener>
		<listener-class>org.jasig.cas.client.session.SingleSignOutHttpSessionListener</listener-class>
	</listener>
	<filter>
		<filter-name>CAS Single Sign Out Filter</filter-name>
		<filter-class>org.jasig.cas.client.session.SingleSignOutFilter</filter-class>
	</filter>
	<filter-mapping>
		<filter-name>CAS Single Sign Out Filter</filter-name>
		<url-pattern>/*</url-pattern>
	</filter-mapping>

	<filter>
		<filter-name>CAS Filter</filter-name>
		<filter-class>org.jasig.cas.client.authentication.AuthenticationFilter</filter-class>
		<init-param>
			<param-name>casServerLoginUrl</param-name>
			<param-value>http://localhost:8080/cas</param-value>
		</init-param>
		<init-param>
			<param-name>serverName</param-name>
			<param-value>http://localhost:8080</param-value>
		</init-param>
	</filter>
	<filter-mapping>
		<filter-name>CAS Filter</filter-name>
		<url-pattern>/*</url-pattern>
	</filter-mapping>

	<!-- 该过滤器负责对Ticket的校验工作,必须启用它 -->
	<filter>
		<filter-name>CAS Validation Filter</filter-name>
		<filter-class>
			org.jasig.cas.client.validation.Cas20ProxyReceivingTicketValidationFilter
		</filter-class>
		<init-param>
			<param-name>casServerUrlPrefix</param-name>
			<param-value>http://localhost:8080/cas</param-value>
		</init-param>
		<init-param>
			<param-name>serverName</param-name>
			<param-value>http://localhost:8080</param-value>
		</init-param>
		<init-param>
			<param-name>encoding</param-name>
			<param-value>UTF-8</param-value>
		</init-param>
	</filter>
	<filter-mapping>
		<filter-name>CAS Validation Filter</filter-name>
		<url-pattern>/*</url-pattern>
	</filter-mapping>

	<!-- 该过滤器负责实现HttpServletRequest请求的包裹, -->
	<!-- 比如允许开发者通过HttpServletRequest的getRemoteUser()方法获得SSO登录用户的登录名,可选配置。 -->

	<filter>
		<filter-name>CAS HttpServletRequest Wrapper Filter</filter-name>
		<filter-class>
			org.jasig.cas.client.util.HttpServletRequestWrapperFilter
		</filter-class>
	</filter>
	<filter-mapping>
		<filter-name>CAS HttpServletRequest Wrapper Filter</filter-name>
		<url-pattern>/*</url-pattern>
	</filter-mapping>

	<!-- 该过滤器使得开发者可以通过org.jasig.cas.client.util.AssertionHolder来获取用户的登录名。 -->
	<!-- 比如AssertionHolder.getAssertion().getPrincipal().getName()。根据客户端获取的方式可以选择使用这两种 -->


	<!-- <filter> <filter-name>CAS Assertion Thread Local Filter</filter-name> 
		<filter-class>org.jasig.cas.client.util.AssertionThreadLocalFilter</filter-class> 
		</filter> <filter-mapping> <filter-name>CAS Assertion Thread Local Filter</filter-name> 
		<url-pattern>/*</url-pattern> </filter-mapping> -->

	<!-- ======================== 单点登录结束 ======================== -->

4.可以用以下jsp代码来验证是否成功获取用户的更多信息:

	<%
	out.write("request.getUserPrincipal()="+request.getUserPrincipal());
	%>
	
	<br/><br/>


<%
//HttpServletRequest request = ServletActionContext.getRequest();
/*获取单点登录服务器传递过来的用户信息*/
AttributePrincipal principal = (AttributePrincipal) request.getUserPrincipal();
if (principal!=null) {
	out.write("principal不为空...");
	Map<String, Object> attributes = principal.getAttributes();
	for (String key : attributes.keySet()) {
		System.out.println(key+"="+attributes.get(key));
	}
}else{
	out.write("principal为空...");
}
%>


取消CAS的HTTPS登陆

1、修改WEB-INF\deployerConfigContext.xml,加入

 p:requireSecure="false"

<property name="authenticationHandlers">
			<list>
				<!--
					| This is the authentication handler that authenticates services by means of callback via SSL, thereby validating
					| a server side SSL certificate.
					+-->
				<bean class="org.jasig.cas.authentication.handler.support.HttpBasedServiceCredentialsAuthenticationHandler"
					p:httpClient-ref="httpClient" p:requireSecure="false"/>
				<!--
					| This is the authentication handler declaration that every CAS deployer will need to change before deploying CAS 
					| into production.  The default SimpleTestUsernamePasswordAuthenticationHandler authenticates UsernamePasswordCredentials
					| where the username equals the password.  You will need to replace this with an AuthenticationHandler that implements your
					| local authentication strategy.  You might accomplish this by coding a new such handler and declaring
					| edu.someschool.its.cas.MySpecialHandler here, or you might use one of the handlers provided in the adaptors modules.
					+-->
				<bean
					class="org.jasig.cas.authentication.handler.support.SimpleTestUsernamePasswordAuthenticationHandler" />
			</list>
		</property>

2、修改WEB-INF\spring-configuration\ticketGrantingTicketCookieGenerator.xml,修改p:cookieSecure=”false”

	<bean id="ticketGrantingTicketCookieGenerator" class="org.jasig.cas.web.support.CookieRetrievingCookieGenerator"
		p:cookieSecure="false"
		p:cookieMaxAge="-1"
		p:cookieName="CASTGC"
		p:cookiePath="/cas" />

3、修改修改WEB-INF\spring-configuration\warnCookieGenerator.xml,修改p:cookieSecure=”false”

	<bean id="warnCookieGenerator" class="org.jasig.cas.web.support.CookieRetrievingCookieGenerator"
		p:cookieSecure="false"
		p:cookieMaxAge="-1"
		p:cookieName="CASPRIVACY"
		p:cookiePath="/cas" />

经过以上三步,cas server端修改完毕

CAS配合server4.0返回用户更多信息

打开deployerConfigContext.xml

<bean id="attributeRepository" class="org.jasig.services.persondir.support.StubPersonAttributeDao"
            p:backingMap-ref="attrRepoBackingMap" />

将以上代码替换成以下代码:

<bean id="attributeRepository" class="org.jasig.services.persondir.support.jdbc.SingleRowJdbcPersonAttributeDao">
		<!-- 指定使用的数据源,此处dataSource是已配置好的数据源 -->
		<constructor-arg index="0" ref="dataSource" />
		<!-- 从数据库中查询信息的SQL语句,通常只需要修改表名即可 -->
		<constructor-arg index="1" value="select * fromuserinfo where {0}" />
		<property name="queryAttributeMapping">
			<map>
				<!-- 上述查询的参数,将userName替换为表中表示用户名的字段名称 -->
				<entry key="username" value="userName" />
			</map>
		</property>
		<property name="resultAttributeMapping">
			<map>
				<!-- 需要返回给Web应用的其它信息,多个信息时可继续增加entry节点 -->
				<!--key值为数据表中的字段名称,value值为Client端取值时的名称标识 -->
				<entry key="address" value="address" />
			</map>
		</property>
	</bean>


接着在这个文件最后的 bean class=”org.jasig.cas.services.RegexRegisteredService” 标签内加上 p:ignoreAttributes=”true”


jsp中Java的运行环境版本等信息显示

		<table width="100%" cellpadding="5">
			<tr>
				<th width="170">Java的运行环境版本</th>
				<td width="*"><%=System.getProperties().getProperty("java.version")%></td>
			</tr>
			<tr>
				<th>Java的运行环境供应商</th>
				<td><%=System.getProperties().getProperty("java.vendor")%></td>
			</tr>
			<tr>
				<th>Java供应商的URL</th>
				<td><%=System.getProperties().getProperty("java.vendor.url")%></td>
			</tr>
			<tr>
				<th>Java的安装路径</th>
				<td><%=System.getProperties().getProperty("java.home")%></td>
			</tr>
			<tr>
				<th>Java的虚拟机规范版本</th>
				<td><%=System.getProperties().getProperty("java.vm.specification.version")%></td>
			</tr>
			<tr>
				<th>Java的虚拟机规范供应商</th>
				<td><%=System.getProperties().getProperty("java.vm.specification.vendor")%></td>
			</tr>
			<tr>
				<th>Java的虚拟机规范名称</th>
				<td><%=System.getProperties().getProperty("java.vm.specification.name")%></td>
			</tr>
			<tr>
				<th>Java的虚拟机实现版本</th>
				<td><%=System.getProperties().getProperty("java.vm.version")%></td>
			</tr>
			<tr>
				<th>Java的虚拟机实现供应商</th>
				<td><%=System.getProperties().getProperty("java.vm.vendor")%></td>
			</tr>
			<tr>
				<th>Java的虚拟机实现名称</th>
				<td><%=System.getProperties().getProperty("java.vm.name")%></td>
			</tr>
			<tr>
				<th>Java运行时环境规范版本</th>
				<td><%=System.getProperties().getProperty("java.specification.version")%></td>
			</tr>
			<tr>
				<th>Java运行时环境规范供应商</th>
				<td><%=System.getProperties().getProperty("java.specification.vender")%></td>
			</tr>
			<tr>
				<th>Java运行时环境规范名称</th>
				<td><%=System.getProperties().getProperty("java.specification.name")%></td>
			</tr>
			<tr>
				<th>Java的类格式版本号</th>
				<td><%=System.getProperties().getProperty("java.class.version")%></td>
			</tr>
			<tr>
				<th>Java的类路径</th>
				<td><%=System.getProperties().getProperty("java.class.path")%></td>
			</tr>
			<tr>
				<th>加载库时搜索的路径列表</th>
				<td><%=System.getProperties().getProperty("java.library.path")%></td>
			</tr>
			<tr>
				<th>默认的临时文件路径</th>
				<td><%=System.getProperties().getProperty("java.io.tmpdir")%></td>
			</tr>
			<tr>
				<th>一个或多个扩展目录的路径</th>
				<td><%=System.getProperties().getProperty("java.ext.dirs")%></td>
			</tr>
			<tr>
				<th>操作系统的名称</th>
				<td><%=System.getProperties().getProperty("os.name")%></td>
			</tr>
			<tr>
				<th>操作系统的构架</th>
				<td><%=System.getProperties().getProperty("os.arch")%></td>
			</tr>
			<tr>
				<th>操作系统的版本</th>
				<td><%=System.getProperties().getProperty("os.version")%></td>
			</tr>
			<tr>
				<th>文件分隔符</th>
				<td><%=System.getProperties().getProperty("file.separator")%></td>
			</tr>
			<tr>
				<th>路径分隔符</th>
				<td><%=System.getProperties().getProperty("path.separator")%></td>
			</tr>
			<tr>
				<th>行分隔符</th>
				<td><%=System.getProperties().getProperty("line.separator")%></td>
			</tr>
			<tr>
				<th>用户的账户名称</th>
				<td><%=System.getProperties().getProperty("user.name")%></td>
			</tr>
			<tr>
				<th>用户的主目录</th>
				<td><%=System.getProperties().getProperty("user.home")%></td>
			</tr>
			<tr>
				<th>用户的当前工作目录</th>
				<td><%=System.getProperties().getProperty("user.dir")%></td>
			</tr>
		</table>


close