一、Eureka服务器+Eureka服务提供者
1、首先到https://start.spring.io/中创建版本为2.1.x项目,在本地的IDEA导入后,首先在pom.xml中增加以下依赖(在pom.xml的<dependencies></dependencies>之间):
<!--Netflix Eureka依赖-->
<dependency>
	<groupId>org.springframework.cloud</groupId>
	<artifactId>spring-cloud-starter-netflix-eureka-server</artifactId>
</dependency>
2、然后在pom.xml的<project></project>之间增加以下关于springcloud的版本管理:
<dependencyManagement>
	<dependencies>
		<dependency>
		<groupId>org.springframework.cloud</groupId>
		<artifactId>spring-cloud-dependencies</artifactId>
		<version>${spring-cloud.version}</version>
		<type>pom</type>
		<scope>import</scope>
		</dependency>
	</dependencies>
</dependencyManagement>
3、接着在在pom.xml的<properties></properties>中增加以下配置(注意:Greenwich对应的是springboot2.1.x版本,如果换成其他的会报错,就这个坑把我坑了一个下午):
<spring-cloud.version>Greenwich.SR3</spring-cloud.version>
4、还有在application.properties中增加如下配置:
1)eureka服务器是这样配置的:
server.port=8761

spring.application.name=eureka-server-1

#注册的域名(注意:可以使用localhost,但在高可用时,不同的eureka-server必须要使用不同的hostname,否则无法相互发现)
eureka.instance.hostname=eureka-server-1
#是否向注册中心注册自己(非高可用时为false,高可用时为true)
eureka.client.registerWithEureka=true
#是否从eureka上获取信息(非高可用时为false,高可用时为true)
eureka.client.fetchRegistry=true
#eureka通信地址(非高可用时写自己的eureka-server地址,高可用时填高可用的目标eureka-server地址)
eureka.client.serviceUrl.defaultZone=http\://eureka-server-2\:8762/eureka/
2)eureka服务提供者是这样配置的:
server.port=8771

spring.application.name=client1

eureka.instance.prefer-ip-address=true
#多个eureka-server时可用","号分隔
eureka.client.serviceUrl.defaultZone=http\://localhost\:8761/eureka/
5、最后在springboot的启动文件xxxApplication.java中增加对应的注解:
1)eureka服务器要使用@EnableEurekaServer注解:
package com.zero4j.eurekaserver;

import org.springframework.boot.SpringApplication;
import org.springframework.boot.autoconfigure.SpringBootApplication;
import org.springframework.cloud.netflix.eureka.server.EnableEurekaServer;

@EnableEurekaServer
@SpringBootApplication
public class EurekaServerApplication {

	public static void main(String[] args) {
		SpringApplication.run(EurekaServerApplication.class, args);
	}

}
2)eureka服务器要使用@EurekaClient1Application注解:
package com.zero4j.eurekaclient1;

import org.springframework.boot.SpringApplication;
import org.springframework.boot.autoconfigure.SpringBootApplication;
import org.springframework.cloud.client.discovery.EnableDiscoveryClient;

@SpringBootApplication
@EnableDiscoveryClient   //也可以用EnableDiscoveryClient代替,前者兼容性更大,后者仅能兼容Eureka
public class EurekaClient1Application {

	public static void main(String[] args) {
		SpringApplication.run(EurekaClient1Application.class, args);
	}

}
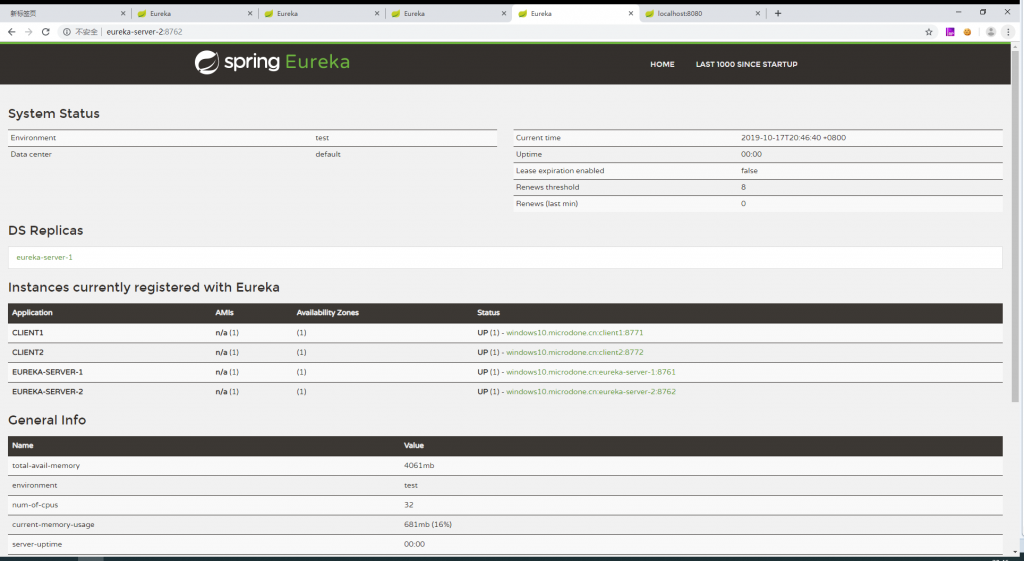
访问eureka-server对应的端口,将会显示以下是最终的运行结果:

二、Eureka服务消费者的相关配置
1、首先到https://start.spring.io/中创建版本为2.1.x项目,在本地的IDEA导入后,首先在pom.xml中增加以下依赖(在pom.xml的<dependencies></dependencies>之间):
<!--Netflix Eureka依赖-->
<dependency>
	<groupId>org.springframework.cloud</groupId>
	<artifactId>spring-cloud-starter-netflix-eureka-client</artifactId>
</dependency>
<dependency>
	<groupId>org.springframework.boot</groupId>
	<artifactId>spring-boot-starter-web</artifactId>
</dependency>
<dependency>
	<groupId>org.springframework.cloud</groupId>
	<artifactId>spring-cloud-starter-netflix-ribbon</artifactId>
</dependency>
2、然后在pom.xml的<project></project>之间增加以下关于springcloud的版本管理:
<dependencyManagement>
	<dependencies>
		<dependency>
		<groupId>org.springframework.cloud</groupId>
		<artifactId>spring-cloud-dependencies</artifactId>
		<version>${spring-cloud.version}</version>
		<type>pom</type>
		<scope>import</scope>
		</dependency>
	</dependencies>
</dependencyManagement>
3、接着在在pom.xml的<properties></properties>中增加以下配置(注意:Greenwich对应的是springboot2.1.x版本,如果换成其他的会报错,就这个坑把我坑了一个下午):
<spring-cloud.version>Greenwich.SR3</spring-cloud.version>
4、还有在application.properties中增加如下配置:
#消费者端口
server.port=8081
spring.application.name=eureka-consumer-1
eureka.instance.hostname=localhost
eureka.client.service-url.defaultZone=http\://localhost\:8761/eureka/,http\://localhost\:8762/eureka/
5、创建RestTemplate模板配置
package com.zero4j.config;

import org.springframework.cloud.client.loadbalancer.LoadBalanced;
import org.springframework.context.annotation.Bean;
import org.springframework.context.annotation.Configuration;
import org.springframework.web.client.RestTemplate;

@Configuration
public class RestTemplateConfig {

	/**
     * RestTemplate:提供了多种便捷访问远程Http服务的方法
     * 是一种简单便捷访问Restful服务模板类,提供用于访问Rest服务的客户端模板类
     */
    @Bean
    @LoadBalanced
    public RestTemplate restTemplate(){
        return new RestTemplate();
    }

}
6、消费者调用eureka服务示例
package com.zero4j.controller;

import java.util.Random;

import org.springframework.beans.factory.annotation.Autowired;
import org.springframework.web.bind.annotation.GetMapping;
import org.springframework.web.bind.annotation.RequestMapping;
import org.springframework.web.bind.annotation.RestController;
import org.springframework.web.client.RestTemplate;

@RestController
@RequestMapping("/")
public class TestControllerProvider {

	@Autowired
    private RestTemplate restTemplate;

	@GetMapping("/test")
    public String test() {

		//通过服务提供者名称调用
		//List<Dept> depts = restTemplate.getForObject("http://wzx-spring-cloud-provider/dept/findAll", List.class);
		//return depts;

		String test = restTemplate.getForObject("http://eureka-client-1/test", String.class);

		return test;
    }

}
7、服务提供者的java示例
package com.zero4j.controller;

import java.util.Random;

import org.springframework.web.bind.annotation.GetMapping;
import org.springframework.web.bind.annotation.RequestMapping;
import org.springframework.web.bind.annotation.RestController;

@RestController
@RequestMapping("/")
public class TestControllerProvider {

	@GetMapping("/test")
    public String test() {
        return "服务提供者1:"+String.valueOf((new Random()).nextInt());
    }

}


