• Daily Archives: 2022年12月1日

Centos7安装Sonarqube7.8

能运行在JDK8和MySQL环境下的最高sonarqube版本是7.8,版本在7.9以上的都要安装jdk11和PostgreSQL了。

下载

到https://www.sonarqube.org/downloads/网站下载历史版本7.8的zip压缩包,

配置

数据库链接

打开sonar目录的/conf/sonar.properties文件,找到并配置:

# User credentials.
# Permissions to create tables, indices and triggers must be granted to JDBC user.
# The schema must be created first.
sonar.jdbc.username=
sonar.jdbc.password=

#----- Embedded Database (default)
# H2 embedded database server listening port, defaults to 9092
#sonar.embeddedDatabase.port=9092

#----- DEPRECATED 
#----- MySQL >=5.6 && <8.0
# Support of MySQL is dropped in Data Center Editions and deprecated in all other editions
# Only InnoDB storage engine is supported (not myISAM).
# Only the bundled driver is supported. It can not be changed.
sonar.jdbc.url=jdbc:mysql://localhost:3306/sonar?useUnicode=true&characterEncoding=utf8&rewriteBatchedStatements=true&useConfigs=maxPerformance&useSSL=false

请在启动前提前创建好对应的数据库。

创建用户 Sonarqube并设为启动账户

# 创建用户
useradd sonar
# 配置密码
passwd sonar
# 将目录权限给予该用户
chown -R sonar:sonar /home/sonarqube-7.8

编辑sonar安装目录的/bin/linux-x86-64/sonar.sh文件,修改用户为sonar

# If specified, the Wrapper will be run as the specified user.
# IMPORTANT - Make sure that the user has the required privileges to write
#  the PID file and wrapper.log files.  Failure to be able to write the log
#  file will cause the Wrapper to exit without any way to write out an error
#  message.
# NOTE - This will set the user which is used to run the Wrapper as well as
#  the JVM and is not useful in situations where a privileged resource or
#  port needs to be allocated prior to the user being changed.
RUN_AS_USER=sonar

启动Sonarqube

直接执行 /home/sonarqube-7.8/bin/linux-x86-64/sonar.sh console 就可以启动 Sonarqube ,并且直观的看到启动日志,建议调试期间使用该命令启动。

等调试结束,启动完全没问题了,就可以使用 ./sonar.sh console & 来实现后台运行,或者直接 ./sonar.sh start 来快速启动。

查看日志

Sonarqube 的日志目录位于 /home/sonarqube-7.8/log/ 目录,分别有:

  • access.log 访问权限相关日志
  • ce.log 不知道啥日志,应该没用
  • sonar.log 主体日志,使用 console 命令启动输出的日志来自该文件
  • es.log 依赖的 Elasticsearch 启动时输出的日志
  • web.log 主体 Web 项目输出的日志

在配置 Sonarqube 时,集中关注 es.log 和 web.log 即可。

sonarQube安装中文插件

访问中文插件的网址并查看对应sonar版本的中文插件版本:https://github.com/xuhuisheng/sonar-l10n-zh

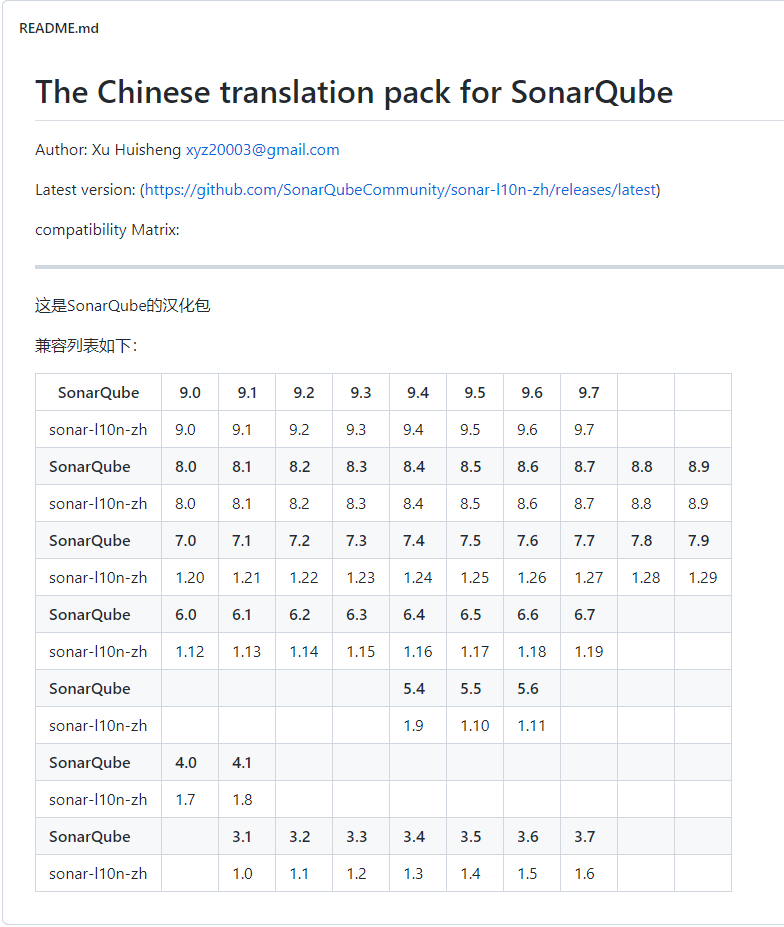
对应sonar7.8的是这个链接:https://github.com/xuhuisheng/sonar-l10n-zh/releases/tag/sonar-l10n-zh-plugin-1.28

下载对应的jar文件:

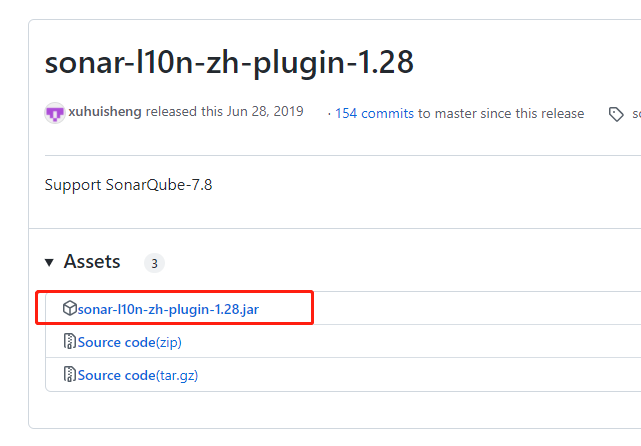
然后将jar包上传到自己sonar项目安装的extensions/plugins/下,并重启sonarqube即可。

其他

sonar的默认端口是9000,默认账号和密码是admin。

Centos7使用yum安装gitlab-ce并安装git-runner、升级gitlab

安装gitlab-ce

一、设置国内yum源

新建 /etc/yum.repos.d/gitlab-ce.repo,内容为:

[gitlab-ce]
name=Gitlab CE Repository
baseurl=https://mirrors.tuna.tsinghua.edu.cn/gitlab-ce/yum/el$releasever/
gpgcheck=0
enabled=1

其实这步可选,不设置的话,默认用国外源的话会非常慢。

二、安装gitlab-ce

sudo yum makecache
sudo yum install gitlab-ce

三、启动gitlab

先运行配置命令:

gitlab-ctl reconfigure

然后运行相关的启动命令:

gitlab-ctl start
gitlab-ctl restart
gitlab-ctl stop

四、打开gitlab面板

默认端口是8088

——————————————————————————

安装gitlan-runner

runner我们选择装直接装在宿主机上,不推荐装在docker里

一、查看已安装的gitlab版本

打开web面板的help页面即可看到。

二、查看可安装的gitlab-runner版本

# 添加正式的GitLab存储库
curl -L "https://packages.gitlab.com/install/repositories/runner/gitlab-runner/script.rpm.sh" | sudo bash
# 查询GitLab版本号列表
yum list gitlab-runner --showduplicates | sort -r

三、安装对应版本的gitlab-runner

# 安装特定版本的GitLab Runner(镜像在国外需要梯子或者切换阿里的镜像)
yum install gitlab-runner-14.5.1-1

注意:如果跟gitlab的版本差异太大,则可能存在未知异常。

四、运行并管理runner

gitlab-runner start    启动gitlab-runner
gitlab-runner stop     关闭gitlab-runner
gitlab-runner restart  重启gitlab-runner 
gitlab-runner status   查看gitlab-runner状态,当服务正在运行时,退出代码为零,而当服务未运行时,退出代码为非零。

五、注册runner

gitlab-runner register

相关注册解释:

  • Enter the GitLab instance URL (for example, https://gitlab.com/): ===>填gitlab的地址
  • Enter the registration token: ===> 填gitlab上注册runner时提示的token
  • Enter a description for the runner: ===>填写runner的描述(可为空)
  • Enter tags for the runner (comma-separated): ===> 填写runner的标签(后面需要用到,一般跟项目的名称一直)
  • Enter optional maintenance note for the runner: ===> 填写可维护说明(可为空)
  • Enter an executor: docker, docker-ssh, custom, parallels, shell, ssh, virtualbox, docker+machine, docker-ssh+machine, instance, kubernetes: ===>填写执行器,一般为shell

六、注销相关命令

gitlab-runner  register     #默认交互模式下使用,非交互模式天机--non-interactice
gitlab-runner  list         #命令列出保存在配置文件中的所有运行程序
gitlab-runner verify   #检查注册runner十分是否可以连接,但不验证gitlab服务是否正在使用runner.--delete删除
gitlab-runner unregister #该命令使用gitlablab取消以及已注册的runner

#使用令牌注销
gitlab-runner unregister--url http://gitlab.example.com/--tokentok3n

#使用名称注销(同名删除一个)
gtlab-runner  unregister --name test-runner

#注销所有
gitlab-runner   unregister --all-runners

七、其他疑问

提示:此作业已阻塞,因为该项目没有分配任何可用Runner。

解决方法一:在.gitlab-ci.yml中补充对应的runner-tag的名称

解决方法二:设置runner可执行没有标签的作业:

20221201190512

—————————————————————–

升级gitlab

到gitlab官网查看最佳升级路径:

https://docs.gitlab.com/ee/update/index.html#upgrade-paths

https://docs.gitlab.com/ee/update/index.html#upgrade-paths

yum install gitlab-ce-<version>
close