SpringBoot2.7.11整合MyBatis+Shiro

引入Shiro依赖

        <!--shiro权限框架-->
        <dependency>
            <groupId>org.apache.shiro</groupId>
            <artifactId>shiro-spring</artifactId>
            <version>1.4.0</version>
        </dependency>

创建pojo实体类

Account.java(账号)

package cn.com.sway.doctor.service.common.model;

import lombok.Data;

@Data
public class Account {

    private String id;
    private String mobile;
    private String password;
    private String name;

}

Role.java(角色)

package cn.com.sway.doctor.service.common.model;

public class Role {

    private String id;
    private String name;

}

Permission.java(权限)

package cn.com.sway.doctor.service.common.model;

public class Permission {

    private String id;
    private String name;

}

创建Mapper

AuthMapper.java

package cn.com.sway.doctor.service.user.mapper;

import cn.com.sway.doctor.service.common.model.Account;
import org.apache.ibatis.annotations.Mapper;

import java.util.List;
import java.util.Map;

@Mapper
public interface AuthMapper {

    Account getAccountByMobile(String mobile);

    List<Map<String,Object>> getAccountPower(String mobile);

}

AuthMapper.xml

<?xml version="1.0" encoding="UTF-8" ?>
<!DOCTYPE mapper
        PUBLIC "-//mybatis.org//DTD Mapper 3.0//EN"
        "http://mybatis.org/dtd/mybatis-3-mapper.dtd">
<mapper namespace="cn.com.sway.doctor.service.user.mapper.AuthMapper">

    <!--通过手机号查找用户信息-->
    <select id="getAccountByMobile" resultType="cn.com.sway.doctor.service.common.model.Account" parameterType="String">
        SELECT *
        FROM account
        WHERE mobile=#{mobile}
    </select>

    <!--通过手机号查找用户权限信息-->
    <select id="getAccountPower" resultType="java.util.HashMap" parameterType="String">
        SELECT account.id, account.mobile, role.name AS role, permission.id AS permission
        FROM account,
             role,
             permission,
             account_role,
             role_permission
        WHERE account.mobile=#{mobile}
          AND account.id=account_role.accountId
          AND account_role.roleId=role.id
          AND role_permission.roleId=role.id
          AND role_permission.permissionId=permission.id
    </select>

</mapper>

创建Service

AuthService.java

package cn.com.sway.doctor.service.user.service;

import cn.com.sway.doctor.service.common.model.Account;

import java.util.List;
import java.util.Map;

public interface AuthService {

    Account getAccountByMobile(String mobile);

    List<Map<String,Object>> getAccountPower(String mobile);

}

AuthServiceImpl.java

package cn.com.sway.doctor.service.user.service.impl;

import cn.com.sway.doctor.service.common.model.Account;
import cn.com.sway.doctor.service.user.mapper.AuthMapper;
import cn.com.sway.doctor.service.user.service.AuthService;
import org.springframework.beans.factory.annotation.Autowired;
import org.springframework.stereotype.Service;

import java.util.List;
import java.util.Map;

@Service
public class AuthServiceImpl implements AuthService {

    @Autowired
    AuthMapper authMapper;

    @Override
    public Account getAccountByMobile(String mobile) {
        return authMapper.getAccountByMobile(mobile);
    }

    @Override
    public List<Map<String, Object>> getAccountPower(String mobile) {
        return authMapper.getAccountPower(mobile);
    }
}

创建验证方法

ShiroRealm.java

package cn.com.sway.doctor.service.user.shiro;

import cn.com.sway.doctor.service.common.model.Account;
import cn.com.sway.doctor.service.user.service.AuthService;
import org.apache.shiro.authc.AuthenticationException;
import org.apache.shiro.authc.AuthenticationInfo;
import org.apache.shiro.authc.AuthenticationToken;
import org.apache.shiro.authc.SimpleAuthenticationInfo;
import org.apache.shiro.authz.AuthorizationInfo;
import org.apache.shiro.authz.SimpleAuthorizationInfo;
import org.apache.shiro.realm.AuthorizingRealm;
import org.apache.shiro.subject.PrincipalCollection;
import org.springframework.beans.factory.annotation.Autowired;
import java.util.List;
import java.util.Map;

public class ShiroRealm extends AuthorizingRealm {

    @Autowired
    private AuthService loginService;

    /**
     * 获取权限
     * @param principalCollection
     * @return
     */
    @Override
    protected AuthorizationInfo doGetAuthorizationInfo(PrincipalCollection principalCollection) {

        //获取登录用户名
        String mobile = (String) principalCollection.getPrimaryPrincipal();
        //添加角色和权限
        SimpleAuthorizationInfo simpleAuthorizationInfo = new SimpleAuthorizationInfo();

        List<Map<String, Object>> powerList = loginService.getAccountPower(mobile);
        System.out.println(powerList.toString());
        for (Map<String, Object> powerMap : powerList) {
            //添加角色
            simpleAuthorizationInfo.addRole(String.valueOf(powerMap.get("role")));
            //添加权限
            simpleAuthorizationInfo.addStringPermission(String.valueOf(powerMap.get("permission")));
        }
        return simpleAuthorizationInfo;
    }

    /**
     * 登录认证
     * @param authenticationToken
     * @return
     * @throws AuthenticationException
     */
    @Override
    protected AuthenticationInfo doGetAuthenticationInfo(AuthenticationToken authenticationToken) throws AuthenticationException {
        //加这一步的目的是在Post请求的时候会先进认证,然后在到请求
        if (authenticationToken.getPrincipal() == null) {
            return null;
        }
        //获取用户唯一标识
        String mobile = authenticationToken.getPrincipal().toString();
        //根据用户名去数据库查询用户信息
        Account account = loginService.getAccountByMobile(mobile);
        if (account == null) {
            //这里返回后会报出对应异常
            return null;
        } else {
            //这里验证authenticationToken和simpleAuthenticationInfo的信息
            SimpleAuthenticationInfo simpleAuthenticationInfo = new SimpleAuthenticationInfo(account, account.getPassword(), getName());
            return simpleAuthenticationInfo;
        }
    }

}

创建配置文件

ShiroConfig.java

package cn.com.sway.doctor.service.user.config;

import cn.com.sway.doctor.service.user.shiro.ShiroRealm;
import org.apache.shiro.spring.security.interceptor.AuthorizationAttributeSourceAdvisor;
import org.apache.shiro.spring.web.ShiroFilterFactoryBean;
import org.apache.shiro.web.mgt.DefaultWebSecurityManager;
import org.springframework.aop.framework.autoproxy.DefaultAdvisorAutoProxyCreator;
import org.springframework.boot.autoconfigure.condition.ConditionalOnMissingBean;
import org.springframework.context.annotation.Bean;
import org.springframework.context.annotation.Configuration;

@Configuration
public class ShiroConfig {
    @Bean
    @ConditionalOnMissingBean
    public DefaultAdvisorAutoProxyCreator defaultAdvisorAutoProxyCreator() {
        DefaultAdvisorAutoProxyCreator defaultAAP = new DefaultAdvisorAutoProxyCreator();
        defaultAAP.setProxyTargetClass(true);
        return defaultAAP;
    }

    //将自己的验证方式加入容器
    @Bean
    public ShiroRealm shiroRealm() {
        ShiroRealm shiroRealm = new ShiroRealm();
        return shiroRealm;
    }

    //权限管理,配置主要是Realm的管理认证
    @Bean
    public DefaultWebSecurityManager securityManager() {
        DefaultWebSecurityManager securityManager = new DefaultWebSecurityManager();
        securityManager.setRealm(shiroRealm());
        return securityManager;
    }

    //shiro核心过滤器
    @Bean("shiroFilter")
    public ShiroFilterFactoryBean shirFilter(DefaultWebSecurityManager securityManager) {
        ShiroFilterFactoryBean shiroFilter = new ShiroFilterFactoryBean();
        shiroFilter.setSecurityManager(securityManager);
        return shiroFilter;
    }

    @Bean
    public AuthorizationAttributeSourceAdvisor authorizationAttributeSourceAdvisor(DefaultWebSecurityManager securityManager) {
        AuthorizationAttributeSourceAdvisor authorizationAttributeSourceAdvisor = new AuthorizationAttributeSourceAdvisor();
        authorizationAttributeSourceAdvisor.setSecurityManager(securityManager);
        return authorizationAttributeSourceAdvisor;
    }
}

创建数据

account表:

/*
 Navicat Premium Data Transfer

 Source Server         : localhost
 Source Server Type    : MySQL
 Source Server Version : 50623
 Source Host           : localhost:3306
 Source Schema         : sway-doctor-service-user

 Target Server Type    : MySQL
 Target Server Version : 50623
 File Encoding         : 65001

 Date: 24/04/2023 22:12:38
*/

SET NAMES utf8mb4;
SET FOREIGN_KEY_CHECKS = 0;

-- ----------------------------
-- Table structure for account
-- ----------------------------
DROP TABLE IF EXISTS `account`;
CREATE TABLE `account`  (
  `id` varchar(255) CHARACTER SET utf8 COLLATE utf8_general_ci NOT NULL,
  `mobile` varchar(255) CHARACTER SET utf8 COLLATE utf8_general_ci NULL DEFAULT NULL,
  `password` varchar(255) CHARACTER SET utf8 COLLATE utf8_general_ci NULL DEFAULT NULL,
  PRIMARY KEY (`id`) USING BTREE
) ENGINE = InnoDB CHARACTER SET = utf8 COLLATE = utf8_general_ci ROW_FORMAT = Compact;

SET FOREIGN_KEY_CHECKS = 1;

role表:

/*
 Navicat Premium Data Transfer

 Source Server         : localhost
 Source Server Type    : MySQL
 Source Server Version : 50623
 Source Host           : localhost:3306
 Source Schema         : sway-doctor-service-user

 Target Server Type    : MySQL
 Target Server Version : 50623
 File Encoding         : 65001

 Date: 24/04/2023 22:14:30
*/

SET NAMES utf8mb4;
SET FOREIGN_KEY_CHECKS = 0;

-- ----------------------------
-- Table structure for role
-- ----------------------------
DROP TABLE IF EXISTS `role`;
CREATE TABLE `role`  (
  `id` varchar(255) CHARACTER SET utf8 COLLATE utf8_general_ci NOT NULL,
  `name` varchar(255) CHARACTER SET utf8 COLLATE utf8_general_ci NULL DEFAULT NULL,
  PRIMARY KEY (`id`) USING BTREE
) ENGINE = InnoDB CHARACTER SET = utf8 COLLATE = utf8_general_ci ROW_FORMAT = Compact;

SET FOREIGN_KEY_CHECKS = 1;

permission表:

/*
 Navicat Premium Data Transfer

 Source Server         : localhost
 Source Server Type    : MySQL
 Source Server Version : 50623
 Source Host           : localhost:3306
 Source Schema         : sway-doctor-service-user

 Target Server Type    : MySQL
 Target Server Version : 50623
 File Encoding         : 65001

 Date: 24/04/2023 22:14:19
*/

SET NAMES utf8mb4;
SET FOREIGN_KEY_CHECKS = 0;

-- ----------------------------
-- Table structure for permission
-- ----------------------------
DROP TABLE IF EXISTS `permission`;
CREATE TABLE `permission`  (
  `id` varchar(255) CHARACTER SET utf8 COLLATE utf8_general_ci NOT NULL,
  `name` varchar(255) CHARACTER SET utf8 COLLATE utf8_general_ci NULL DEFAULT NULL,
  PRIMARY KEY (`id`) USING BTREE
) ENGINE = InnoDB CHARACTER SET = utf8 COLLATE = utf8_general_ci ROW_FORMAT = Compact;

SET FOREIGN_KEY_CHECKS = 1;

account_role表:

/*
 Navicat Premium Data Transfer

 Source Server         : localhost
 Source Server Type    : MySQL
 Source Server Version : 50623
 Source Host           : localhost:3306
 Source Schema         : sway-doctor-service-user

 Target Server Type    : MySQL
 Target Server Version : 50623
 File Encoding         : 65001

 Date: 24/04/2023 22:14:08
*/

SET NAMES utf8mb4;
SET FOREIGN_KEY_CHECKS = 0;

-- ----------------------------
-- Table structure for account_role
-- ----------------------------
DROP TABLE IF EXISTS `account_role`;
CREATE TABLE `account_role`  (
  `id` varchar(255) CHARACTER SET utf8 COLLATE utf8_general_ci NOT NULL,
  `accountId` varchar(255) CHARACTER SET utf8 COLLATE utf8_general_ci NULL DEFAULT NULL,
  `roleId` varchar(255) CHARACTER SET utf8 COLLATE utf8_general_ci NULL DEFAULT NULL,
  PRIMARY KEY (`id`) USING BTREE
) ENGINE = InnoDB CHARACTER SET = utf8 COLLATE = utf8_general_ci ROW_FORMAT = Compact;

SET FOREIGN_KEY_CHECKS = 1;

role_permission表:

/*
 Navicat Premium Data Transfer

 Source Server         : localhost
 Source Server Type    : MySQL
 Source Server Version : 50623
 Source Host           : localhost:3306
 Source Schema         : sway-doctor-service-user

 Target Server Type    : MySQL
 Target Server Version : 50623
 File Encoding         : 65001

 Date: 24/04/2023 22:14:36
*/

SET NAMES utf8mb4;
SET FOREIGN_KEY_CHECKS = 0;

-- ----------------------------
-- Table structure for role_permission
-- ----------------------------
DROP TABLE IF EXISTS `role_permission`;
CREATE TABLE `role_permission`  (
  `id` varchar(255) CHARACTER SET utf8 COLLATE utf8_general_ci NOT NULL,
  `roleId` varchar(255) CHARACTER SET utf8 COLLATE utf8_general_ci NULL DEFAULT NULL,
  `permissionId` varchar(255) CHARACTER SET utf8 COLLATE utf8_general_ci NULL DEFAULT NULL,
  PRIMARY KEY (`id`) USING BTREE
) ENGINE = InnoDB CHARACTER SET = utf8 COLLATE = utf8_general_ci ROW_FORMAT = Compact;

SET FOREIGN_KEY_CHECKS = 1;

使用方法

package cn.com.sway.doctor.service.user.controller.api.v1;

import cn.com.sway.doctor.service.common.model.Account;
import cn.com.sway.doctor.service.common.query.AccountQuery;
import cn.com.sway.doctor.service.user.dao.AccountDao;
import org.apache.shiro.authz.annotation.*;
import org.springframework.beans.factory.annotation.Autowired;
import org.springframework.web.bind.annotation.*;

import java.util.List;

@RestController
@RequestMapping("/api/v1/accounts")
public class AccountsApiControllerV1 {

    @Autowired
    private AccountDao accountDao;

    //@RequiresAuthentication
    //@RequiresGuest
    //@RequiresUser
    @RequiresRoles("admin")
    //@RequiresPermissions("account-manage")
    @ResponseBody
    @GetMapping("")
    public String query() {

        AccountQuery accountQuery = new AccountQuery();
        List<Account> list = accountDao.query(accountQuery);

        System.out.println(accountDao.query(accountQuery).size());

        return "account total: "+list.size();
    }

}

SpringBoot2.7.11整合MyBatis2.2.2

pom.xml增加如下依赖:

        <!--MyBatis的整合-->
        <!-- https://mvnrepository.com/artifact/org.mybatis.spring.boot/mybatis-spring-boot-starter -->
        <dependency>
            <groupId>org.mybatis.spring.boot</groupId>
            <artifactId>mybatis-spring-boot-starter</artifactId>
            <version>2.2.2</version>
        </dependency>
        <!-- https://mvnrepository.com/artifact/mysql/mysql-connector-java -->
        <dependency>
            <groupId>mysql</groupId>
            <artifactId>mysql-connector-java</artifactId>
            <version>8.0.33</version>
        </dependency>
        <!-- https://mvnrepository.com/artifact/junit/junit -->
        <dependency>
            <groupId>junit</groupId>
            <artifactId>junit</artifactId>
            <version>4.13</version>
            <scope>test</scope>
        </dependency>
        <!-- https://mvnrepository.com/artifact/com.alibaba/druid-spring-boot-starter -->
        <dependency>
            <groupId>com.alibaba</groupId>
            <artifactId>druid-spring-boot-starter</artifactId>
            <version>1.2.17</version>
        </dependency>

application.properties文件增加如下配置:

spring.datasource.url=jdbc:mysql://localhost:3306/sway-doctor-service-user
spring.datasource.username=root
spring.datasource.password=
spring.datasource.driver-class-name=com.mysql.cj.jdbc.Driver

# 添加并配置第三方数据源Druid
# 数据源类型
spring.datasource.type=com.alibaba.druid.pool.DruidDataSource
# 初始化连接数
spring.datasource.initialSize=20
# 最小空闲数
spring.datasource.minIdle=10
# 最大连接数
spring.datasource.maxActive=100

# 配置MyBatis的XML配置文件位置
mybatis.mapper-locations = classpath:mapper/*.xml
# 配置XML映射文件中指定的实体类别名路径
#mybatis.type-aliases-package = cn.com.sway.doctor.service.common
# 开启驼峰命名匹配映射
mybatis.configuration.map-underscore-to-camel-case=true
#mybatis.configuration.log-impl = org.apache.ibatis.logging.stdout.StdOutImpl

编写DataSourceConfig.java数据源配置文件,代码如下:

package cn.com.sway.doctor.service.user.config;

import com.alibaba.druid.pool.DruidDataSource;
import org.springframework.boot.context.properties.ConfigurationProperties;
import org.springframework.context.annotation.Bean;
import org.springframework.context.annotation.Configuration;

import javax.sql.DataSource;

@Configuration
public class DataSourceConfig {
    @Bean
    @ConfigurationProperties(prefix = "spring.datasource")
    public DataSource getDruid() {
        return new DruidDataSource();
    }
}

编写实体Account.java文件,代码如下:

package cn.com.sway.doctor.service.common.model;

import lombok.Data;

@Data
public class Account {

    private String id;
    private String mobile;
    private String password;
    private String name;

}

编写查询用额AccountQuery.java文件,代码如下:

package cn.com.sway.doctor.service.common.query;

import lombok.Data;

import javax.validation.constraints.Min;
import javax.validation.constraints.Pattern;

@Data
public class AccountQuery {

    private String id;

    @Pattern(regexp = "1\\d{10}", message = "请输入正确的手机号啊")
    private String mobile;

    private String password;

    @Min(value = 0, message = "offset不能为负数")
    private Integer offset;

    @Min(value = 0, message = "limit不能为负数")
    private Integer  limit;

}

编写AccountDao.java文件,代码如下:

package cn.com.sway.doctor.service.user.dao;

import cn.com.sway.doctor.service.common.model.Account;
import cn.com.sway.doctor.service.common.query.AccountQuery;
import org.apache.ibatis.annotations.Mapper;
import org.springframework.validation.annotation.Validated;

import java.util.List;

@Mapper
public interface AccountDao {

    List<Account> query(@Validated AccountQuery accountQuery);

}

编写AccountMapper.xml,代码如下:

<?xml version="1.0" encoding="UTF-8" ?>
<!DOCTYPE mapper
        PUBLIC "-//mybatis.org//DTD Mapper 3.0//EN"
        "http://mybatis.org/dtd/mybatis-3-mapper.dtd">

<mapper namespace="cn.com.sway.doctor.service.user.dao.AccountDao">

    <resultMap id="account" type="cn.com.sway.doctor.service.common.model.Account">
        <id property="id" column="id"/>
        <result property="mobile" column="mobile"/>
        <result property="name" column="name"/>
    </resultMap>

    <!-- 查询账号列表 -->
    <select id="query" resultMap="account">
        SELECT * FROM account
            <where>
                <if test="mobile!=null and mobile!=''">
                    and mobile = #{mobile}
                </if>
            </where>
    </select>

</mapper>

编写单元测,代码如下:

package cn.com.sway.doctor.service.user;

import cn.com.sway.doctor.service.common.query.AccountQuery;
import cn.com.sway.doctor.service.user.dao.AccountDao;
import org.junit.jupiter.api.Test;
import org.springframework.beans.factory.annotation.Autowired;
import org.springframework.boot.test.context.SpringBootTest;

@SpringBootTest
class ServiceUserApplicationTests {

    @Autowired
    private AccountDao accountDao;

    @Test
    public void testAccountMapper(){
        AccountQuery accountQuery = new AccountQuery();
        accountQuery.setMobile("18688814832");
        System.out.println(accountDao.query(accountQuery).size());
    }

}

Git提交规范

用于说明 commit 的类别,常见类别如下:

  • feat:新增功能(feature)
  • fix:修复补丁(bug)
  • docs:修订文档,如 Readme, Change Log, Contribute 等
  • refactor:代码重构,未新增任何功能和修复任何 bug
  • style: 仅调整空格、格式缩进等(不改变代码逻辑的变动)
  • perf:优化相关,改善性能和体验的修改
  • test:测试用例的增加/修改
  • chore:非 src 和 test 的修改
  • merge:合并分支或冲突等
  • revert: 回滚到上一个版本
  • build:改变构建流程,新增依赖库、工具等(例如 webpack、maven 修改)
  • ci:自动化流程配置修改

作者:flyjar
链接:https://www.jianshu.com/p/2d3679cb59ec
来源:简书
著作权归作者所有。商业转载请联系作者获得授权,非商业转载请注明出处。

搭建微服务架构:Zookeeper+Dubbo(同时支持Rest接口)

安装Zookeeper

https://www.apache.org/dyn/closer.lua/zookeeper/zookeeper-3.8.1/apache-zookeeper-3.8.1-bin.tar.gz

下载解压后需要先配置zoo.cfg,可以用conf/zoo_sample.cfg作为样本来进行配置,有两个关键参数:

dataDir=D:/apache-zookeeper-3.8.1-bin/data

admin.serverPort=8888(默认为8080)

然后运行zkServer即可(需要配置好java的环境变量)

安装Dubbo-admin

https://github.com/apache/dubbo-admin

到这里下载release发行版本

解压后运行startup即可

运行后可以访问http://localhost:8080/登录后台查看微服务的运行情况:

默认账号密码都为root,修改账号密码只需要到conf中修改即可。

在idea中创建微服务项目

一般需要至少创建三个工程,如下图所示:

先创建一个父工程(示例:sway-doctor),为普通的maven项目即可

引入dubbo和zookeeper依赖,这样就不需要子项目重复引用了。

pom文件如下:

<?xml version="1.0" encoding="UTF-8"?>
<project xmlns="http://maven.apache.org/POM/4.0.0" xmlns:xsi="http://www.w3.org/2001/XMLSchema-instance"
         xsi:schemaLocation="http://maven.apache.org/POM/4.0.0 https://maven.apache.org/xsd/maven-4.0.0.xsd">
    <modelVersion>4.0.0</modelVersion>

    <!--springboot版本-->
    <parent>
        <groupId>org.springframework.boot</groupId>
        <artifactId>spring-boot-starter-parent</artifactId>
        <version>2.7.11</version>
        <relativePath/> <!-- lookup parent from repository -->
    </parent>

    <!--当前工程的版本信息-->
    <groupId>cn.com.sway.doctor</groupId>
    <artifactId>sway-doctor</artifactId>
    <version>0.0.1-SNAPSHOT</version>
    <name>sway-doctor</name>
    <description>sway-doctor</description>

    <!--设置父工程的包为pom-->
    <packaging>pom</packaging>

    <!--引入子模块-->
    <modules>
        <module>service-common</module>
        <module>service-disease</module>
        <module>service-main</module>
    </modules>

    <!--版本控制-->
    <properties>
        <java.version>1.8</java.version>
        <dubbo.version>3.2.0</dubbo.version>
    </properties>

    <dependencies>
        <dependency>
            <groupId>org.springframework.boot</groupId>
            <artifactId>spring-boot-starter</artifactId>
        </dependency>

        <dependency>
            <groupId>org.springframework.boot</groupId>
            <artifactId>spring-boot-starter-test</artifactId>
            <scope>test</scope>
        </dependency>

        <!-- 引入spring-boot-starter以及dubbo和curator的依赖 -->
        <dependency>
            <groupId>org.apache.dubbo</groupId>
            <artifactId>dubbo-spring-boot-starter</artifactId>
            <version>${dubbo.version}</version>
        </dependency>
        <dependency>
            <groupId>org.apache.dubbo</groupId>
            <artifactId>dubbo</artifactId>
            <version>${dubbo.version}</version>
        </dependency>
        <!-- 整合dubbo与zookeeper -->
        <dependency>
            <groupId>org.apache.dubbo</groupId>
            <artifactId>dubbo-dependencies-zookeeper</artifactId>
            <version>${dubbo.version}</version>
            <type>pom</type>
        </dependency>

        <!--引入公共工程-->
        <dependency>
            <groupId>cn.com.sway.doctor</groupId>
            <artifactId>service-common</artifactId>
            <version>0.0.1-SNAPSHOT</version>
            <scope>compile</scope>
        </dependency>

        <!-- https://mvnrepository.com/artifact/org.projectlombok/lombok -->
        <dependency>
            <groupId>org.projectlombok</groupId>
            <artifactId>lombok</artifactId>
        </dependency>

    </dependencies>

</project>

再创建公共工程,一般命名为common(示例:service-common),为普通的maven项目即可

主要存放公共的实体类以及接口类。

同时在父工程的pom文件中引入该依赖。

Disease代码如下:

package cn.com.sway.doctor.service.common.model;

import lombok.Data;

import java.io.Serializable;

@Data
public class Disease implements Serializable {

    private String id;

    private String name;

}

DiseaseService代码如下:

package cn.com.sway.doctor.service.common.service;

import cn.com.sway.doctor.service.common.model.Disease;

import java.util.List;

public interface DiseaseService {

    List<Disease> getList();

}

pom文件代码如下:

<?xml version="1.0" encoding="UTF-8"?>
<project xmlns="http://maven.apache.org/POM/4.0.0"
         xmlns:xsi="http://www.w3.org/2001/XMLSchema-instance"
         xsi:schemaLocation="http://maven.apache.org/POM/4.0.0 http://maven.apache.org/xsd/maven-4.0.0.xsd">
    <parent>
        <artifactId>sway-doctor</artifactId>
        <groupId>cn.com.sway.doctor</groupId>
        <version>0.0.1-SNAPSHOT</version>
    </parent>
    <modelVersion>4.0.0</modelVersion>

    <artifactId>service-common</artifactId>

</project>

接着创建微服务SpringBoot工程,一般为provider或者微服务的名称

实现公共工程的service接口,并配置dubbo和zookeeper。

pom.xml的代码如下:

<?xml version="1.0" encoding="UTF-8"?>
<project xmlns="http://maven.apache.org/POM/4.0.0" xmlns:xsi="http://www.w3.org/2001/XMLSchema-instance"
         xsi:schemaLocation="http://maven.apache.org/POM/4.0.0 https://maven.apache.org/xsd/maven-4.0.0.xsd">
    <modelVersion>4.0.0</modelVersion>

    <parent>
        <!--原来的独立springboot工程配置需要注释掉-->
        <!--<groupId>org.springframework.boot</groupId>
        <artifactId>spring-boot-starter-parent</artifactId>
        <version>2.7.11</version>
        <relativePath/> &lt;!&ndash; lookup parent from repository &ndash;&gt;-->

        <!--引入父工程的pom信息-->
        <artifactId>sway-doctor</artifactId>
        <groupId>cn.com.sway.doctor</groupId>
        <version>0.0.1-SNAPSHOT</version>
    </parent>

    <groupId>cn.com.sway.doctor</groupId>
    <artifactId>service-disease</artifactId>
    <version>0.0.1-SNAPSHOT</version>

    <!--设置打包方式-->
    <packaging>jar</packaging>

    <name>service-disease</name>
    <description>service-disease</description>
    <properties>
        <java.version>1.8</java.version>
    </properties>

    <dependencies>
        <dependency>
            <groupId>org.springframework.boot</groupId>
            <artifactId>spring-boot-starter</artifactId>
        </dependency>

        <dependency>
            <groupId>org.springframework.boot</groupId>
            <artifactId>spring-boot-starter-test</artifactId>
            <scope>test</scope>
        </dependency>


        <!-- REST support dependencies -->
        <!-- https://mvnrepository.com/artifact/org.jboss.resteasy/resteasy-client -->
        <dependency>
            <groupId>org.jboss.resteasy</groupId>
            <artifactId>resteasy-client</artifactId>
            <version>4.7.7.Final</version>
        </dependency>
        <!-- https://mvnrepository.com/artifact/org.jboss.resteasy/resteasy-netty4 -->
        <dependency>
            <groupId>org.jboss.resteasy</groupId>
            <artifactId>resteasy-netty4</artifactId>
            <version>4.7.7.Final</version>
            <scope>test</scope>
        </dependency>

    </dependencies>

    <build>
        <plugins>
            <plugin>
                <groupId>org.springframework.boot</groupId>
                <artifactId>spring-boot-maven-plugin</artifactId>
            </plugin>
        </plugins>
    </build>

</project>

DiseaseServiceImpl的代码如下:

package cn.com.sway.doctor.service.disease.impl;

import cn.com.sway.doctor.service.common.model.Disease;
import cn.com.sway.doctor.service.common.service.DiseaseService;
import org.apache.dubbo.config.annotation.DubboService;
import org.apache.dubbo.config.annotation.Service;

import javax.ws.rs.Consumes;
import javax.ws.rs.GET;
import javax.ws.rs.Path;
import javax.ws.rs.Produces;
import javax.ws.rs.core.MediaType;
import java.util.ArrayList;
import java.util.List;

@DubboService(protocol = {"dubbo", "rest"})
@Path("/diseases")
public class DiseaseServiceImpl implements DiseaseService {

    @GET
    @Path("")
    @Produces({MediaType.APPLICATION_JSON})
    @Consumes({MediaType.APPLICATION_JSON})
    @Override
    public List<Disease> getList() {

        List<Disease> list = new ArrayList<Disease>();

        Disease ganmao = new Disease();
        ganmao.setId("1");
        ganmao.setName("感冒");
        list.add(ganmao);

        Disease kesou = new Disease();
        kesou.setId("2");
        kesou.setName("咳嗽");
        list.add(kesou);

        Disease fashao = new Disease();
        fashao.setId("3");
        fashao.setName("发烧");
        list.add(fashao);

        return list;
    }
}

application.yaml文件配置如下:

# -------------------- Dubbo 配置 BEGIN --------------------
dubbo:
  registry: # 单注册中心,注意属性级别:dubbo.registry,注意多注册中心格式:@Service(registry = {"registry1","registry2","registry3"})
    register: true # true(默认), false:表示服务不注册到注册中心(只订阅,直连服务正常),且dubbo-admin不显示
    address: zookeeper://127.0.0.1:2181
#  registries: # 多注册中心,注意属性级别:dubbo.registries, 不同的方法可以用@Service(registry = {"registry2"}),指定不同的注册中心
#    provider1:
#      register: false #默认true, false:表示服务不注册到注册中心
#      address: zookeeper://55.55.55.82:2181
#    provider2:
#      register: false
#      address: zookeeper://55.55.55.196:2181
#    provider3:
#      register: false
#      address: zookeeper://55.55.55.139:2181
  application:
    name: sway-doctor-service-disease
  #    qos-enable: true # 默认值 true, 是否允许在线运维, 配置和查询服务
  #    qos-port: 22222 # 默认值2222
  #    qos-accept-foreign-ip: false # 默认false , 不允许远程访问 telnet
  scan:
    base-packages: cn.com.sway.doctor.service.disease.serivce
  protocols:
    dubbo:
      name: dubbo
      port: 28080
    rest:
      name: rest
      port: 8081
      server: netty
  provider:
    retries: 0        # 服务提供者无需重试
    timeout: 6000     # 默认只有1s
# -------------------- Dubbo 配置 END --------------------

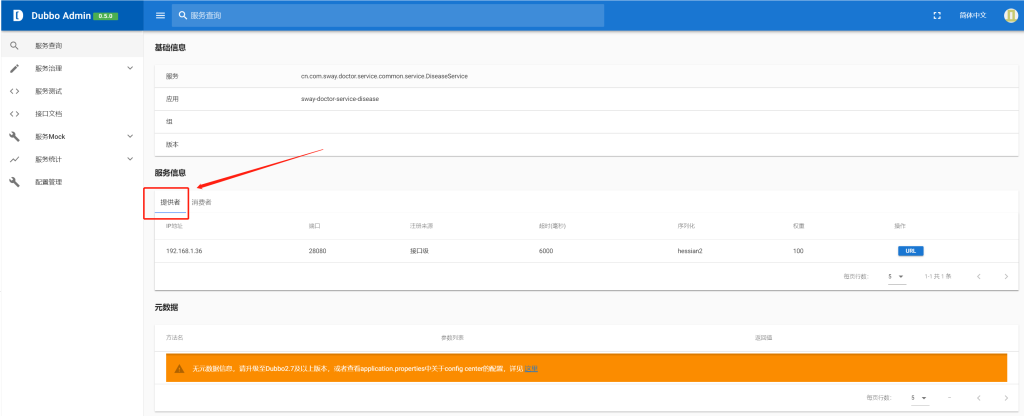
最后还需要在SpringBoot的启动类中增加@EnableDubbo注解,启动后可以在Dubbo中看见对应的服务:

最后创建消费者,一般为consumer或main

攥写RestController,以便让外部调用。

DiseaseApiControllerV1的代码如下:

package cn.com.sway.doctor.service.main.controller.api.v1;

import cn.com.sway.doctor.service.common.service.DiseaseService;
import org.apache.dubbo.config.annotation.Reference;
import org.springframework.web.bind.annotation.GetMapping;
import org.springframework.web.bind.annotation.RequestMapping;
import org.springframework.web.bind.annotation.RestController;

@RestController
@RequestMapping("/api/v1/diseases")
public class DiseaseApiControllerV1 {

    @Reference
    private DiseaseService diseasetService;

    @GetMapping("")
    public Object student(){
        return this.diseasetService.getList();
    }

}

配置文件application.properties的代码如下:

server.port=8000  

dubbo.application.name=sway-doctor-service-main
dubbo.registry.address=zookeeper://127.0.0.1:2181
dubbo.monitor.protocol=registry

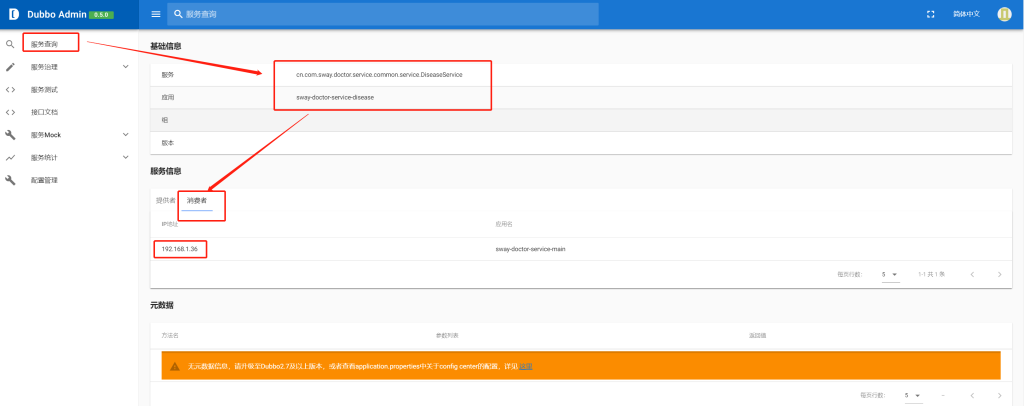
启动后查看dubbo-admin后可以看到对应的服务消费者信息:

测试服务调用的结果,访问http://localhost:8000/api/v1/diseases,输出结果如下图所示即为成功:

修改gitlab-runner的执行用户为root

gitlab-runner的默认执行用户为gitlab-runner,如果执行某些操作时提示权限不足,则可以使用本方法修改gitlab-runner的执行用户为root,从而执行更高权限的指令。

查看当前gitlab-runner的运行用户

使用以下指令查看:、

ps aux|grep gitlab-runner

如下图所示,可以看到当前执行用户为gitlan-runner:

方法一:

修改gitlab-runner的运行参数

编辑/etc/systemd/system/gitlab-runner.service文件,并修改–user后的参数为root:

[Service]
StartLimitInterval=5
StartLimitBurst=10
ExecStart=/usr/bin/gitlab-runner "run" "--working-directory" "/home/gitlab-runner" "--config" "/etc/gitlab-runner/config.toml" "--service" "gitlab-runner" "--user" "root"

重启gitlab-runner

systemctl daemon-reload
systemctl restart gitlab-runner

方法二:

执行以下指令:

sudo gitlab-runner uninstall #删除gitlab-runner

gitlab-runner install --working-directory /home/gitlab-runner --user root #安装并设置--user(例如我想设置为root)

sudo service gitlab-runner restart #重启gitlab-runner

确认修改生效

再次使用以下指令:

ps aux|grep gitlab-runner

若修改成功,则如下图所示:

CentOS7下纯净安装Maven

下载maven

到apache-maven官网中下载对应的zip包:

https://maven.apache.org/download.cgi

解压maven

如果是zip包则使用unzip ***.zip命令;

如果是tar包则使用tar -zxvf xxx.tar命令。

设置环境变量

编辑/etc/profile文件,添加以下设置:

#MAVEN的环境变量
export MAVEN_HOME=/home/apache-maven-3.8.6

#PATH环境变量
export PATH=$MAVEN_HOME/bin

注意:如果有多个path变量请使用“:”号隔开。

测试maven

执行 mvn –version命令,如果安装顺利,则出现maven的版本号,如下图所示:

在树莓派上使用docker运行java程序并操作gpio

在树莓派64位的OS上是无法使用wiringpi的

官方编译的wiringpi在32位下编写的,因此在64位系统中运行会出现如下错误:

虽然有大神提供了自己编译的64位wiringpi,但是依然不行,资料如下:

https://github.com/guation/WiringPi-arm64

https://gitee.com/guation/WiringPi-arm64

修改DockerFile

一般docker运行java程序是会使用openjdk:8的镜像,但是树莓派虽然是64位硬件,但wiringpi只能运行在32位的OS中,因此若需要操作gpio则只能使用32位的OS。再加上openjdk:8并没有提供arm版本,因此需要指定成armv7版本的jdk镜像才能成功打包docker镜像:

#FROM openjdk:8

#指定armv7版本的java8
FROM balenalib/armv7hf-openjdk

在DockerFile中引入WiringPi

COPY ./wiringpi-2.61-1-armhf.deb /wiringpi-2.61-1-armhf.deb
RUN dpkg -i /wiringpi-2.61-1-armhf.deb

close